Minisprite Engine Manual
Minisprite Engine is a foreground desktop widget that puts small animated sprites — memes, mascots, cute loops — on top of your desktop. This is the full reference manual.
Getting Started
Minisprite Engine is a foreground desktop widget. It puts small animated sprites — memes, mascots, cute loops — on top of your desktop, where wallpaper-style background apps can't reach. Sprites sit above your wallpaper, above icons, and above (or below) other windows depending on your settings.
This chapter covers installation, first launch, the system tray, and how to quit cleanly.
Installing
Install from Steam. The build is self-contained (the .NET 9 runtime is bundled), so no separate runtime install is required. On a clean Windows 10/11 machine the install finishes in under a minute.
System requirements:
| Minimum | Recommended | |
|---|---|---|
| OS | Windows 10 version 1809 (Build 17763) or later, 64-bit | Windows 11 or later |
| Processor | Dual Core CPU | Intel Core i3 or better |
| Memory | 4 GB RAM | 8 GB RAM |
| Graphics | Integrated Graphics (Intel HD 4000 or equivalent) | Dedicated GPU recommended (GTX 750 or better) |
| Storage | 700 MB available space | 1 GB available space |
Both the minimum and recommended configurations require a 64-bit processor and operating system. Steam must be running — Workshop and Steam Cloud sync depend on it.
First launch
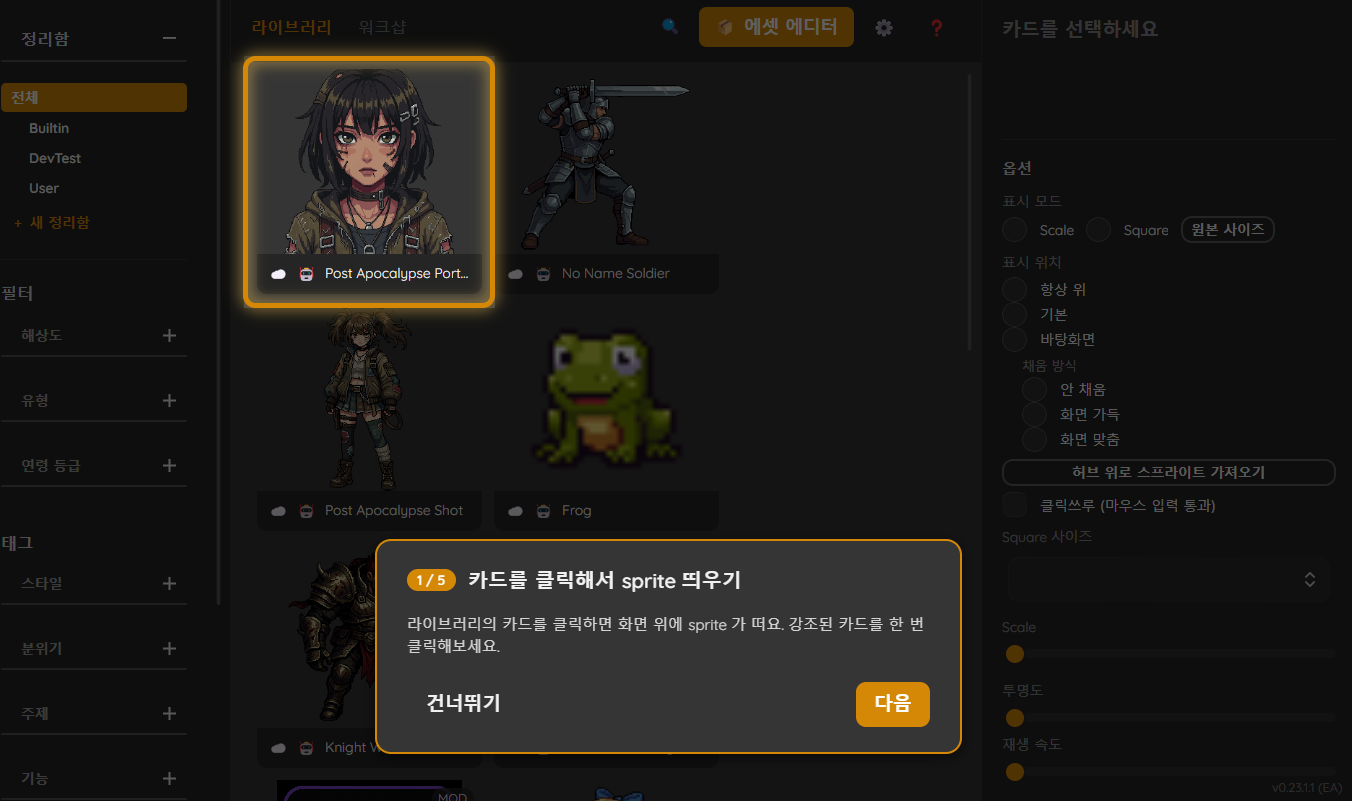
The first time you launch the app, three things happen:
- The Hub window opens with a five-step tutorial overlay.
- The tray icon appears in your Windows notification area.
- A welcome mascot sprite spawns automatically and tucks itself against the top-left corner of the Hub, so the desktop isn't empty on your very first run.
That mascot is the only sprite active at first — the rest of the library is full of cards, but nothing else is on the desktop until you click a card. The first tutorial step points at a highlighted card and tells you to click it; doing so spawns your first chosen sprite. Clicking the same card again closes it.
The auto-mascot appears only on the very first launch (when there's no saved state yet). If you close it and quit, it won't come back on the next launch — from then on the desktop restores exactly the sprites you left active.
The tutorial then walks you through the Workshop tab, the Asset Editor, and Settings. You can skip it at any time; it can be replayed from the Help (❓) button in the Hub or from Settings.
If Steam is not running, a dialog appears explaining that Steam is required and the app exits. Start Steam first, then launch the app again.
The Hub
The Hub is the main window. It has two tabs along the top:
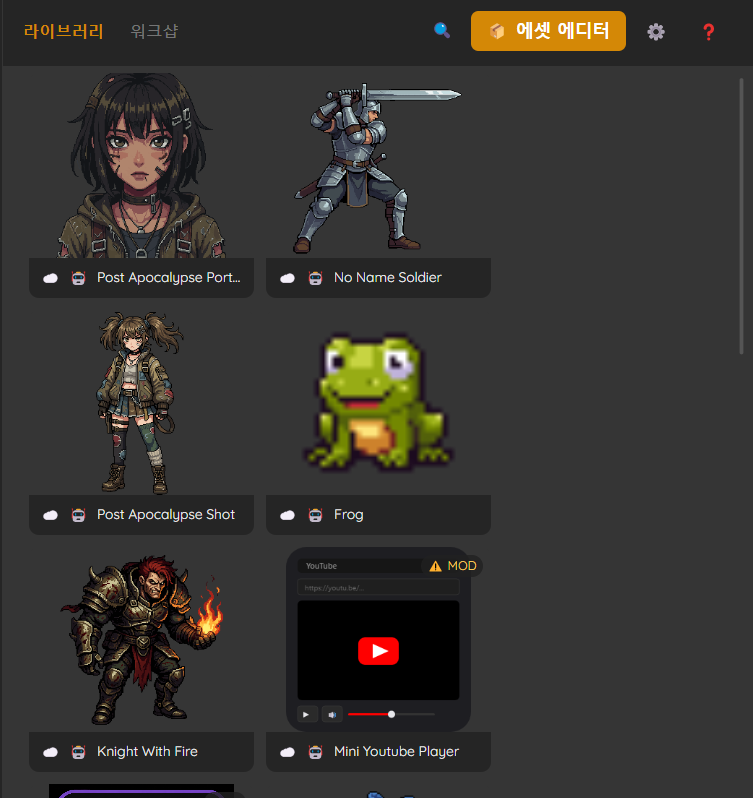
- Library — every sprite you own (built-in, your own drafts after publishing, and anything subscribed from the Workshop).
- Workshop — search and subscribe to sprites made by other users.
The music player isn't a tab — it's a separate compact window opened from the tray (Music Player) or automatically when you activate a sprite that carries a music track. See the Music Player chapter.
The Hub opens automatically every time you launch the app from Steam or from a desktop shortcut. Any sprites that were active when you last quit come back at the same positions and sizes — close the Hub, and the desktop looks exactly as you left it. (The exception is launches triggered by Windows autostart — see the next section.)
Closing the Hub window does not quit the app. The app stays running in the tray so your active sprites keep animating.
The system tray icon
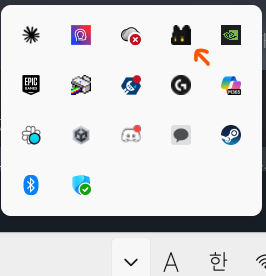
The tray icon (a small Minisprite logo, near the clock) is the app's always-on entry point.
- Left-click the tray icon: opens the Hub.
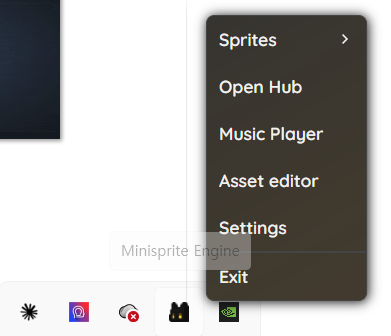
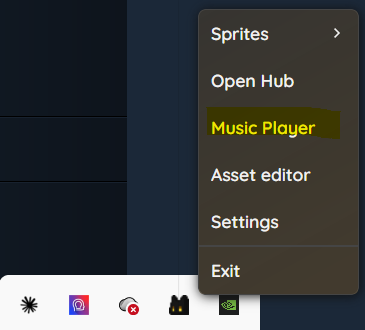
- Right-click the tray icon: a menu with quick access to Sprites (a submenu listing every active sprite with per-sprite toggles), Open Hub, Music Player, Asset editor, Settings, and Exit.
Quitting
Three ways to quit, from least to most permanent:
- Close the Hub window (X button). Sprites and tray stay running.
- Close all sprites individually (right-click sprite → Close, or Tray → Sprites ▶ → sprite name → Close). The tray stays running so the Hub can be reopened.
- Tray → Exit. Stops everything. A confirmation dialog appears if any sprites are active.
Autostart on boot
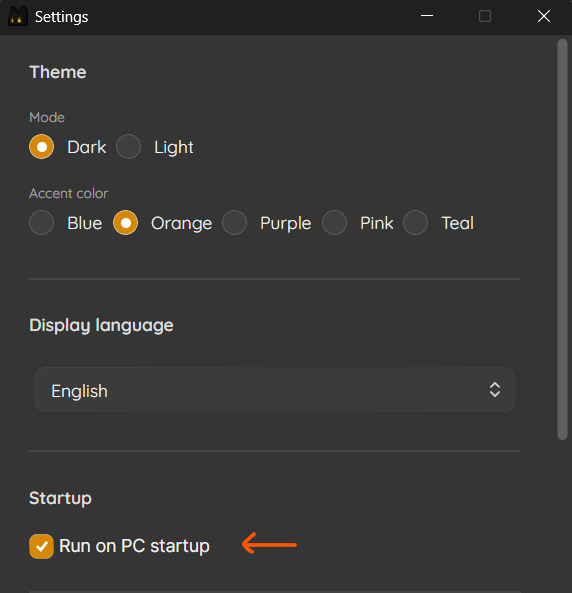
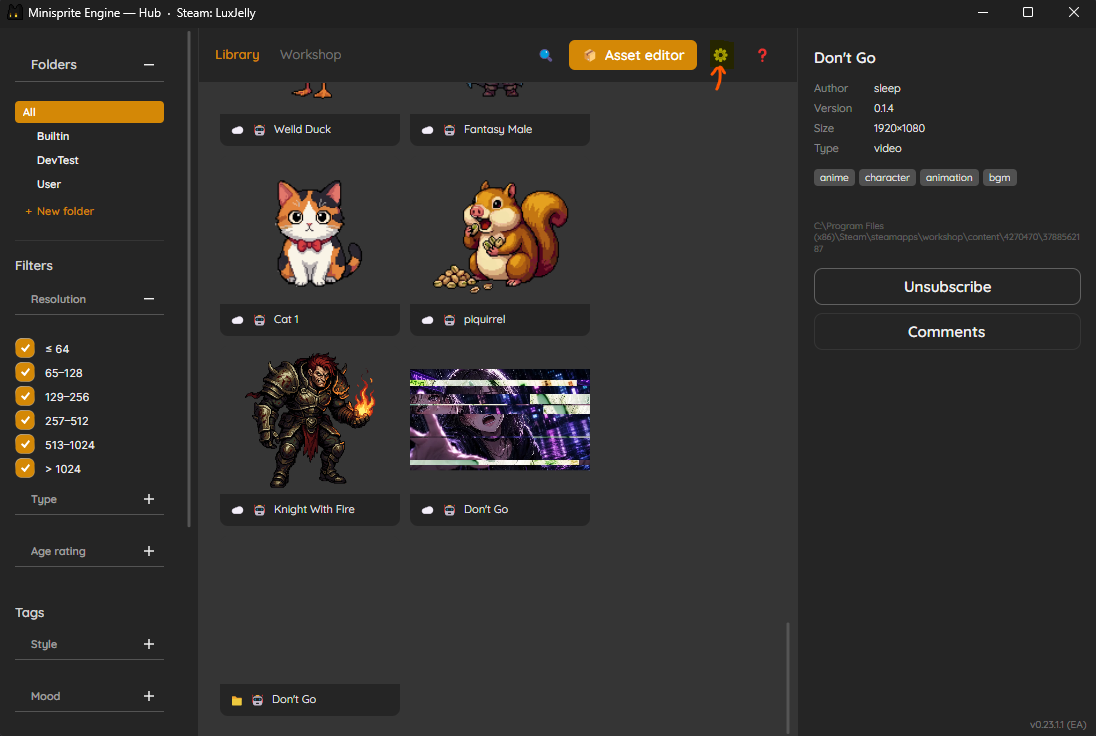
Settings (⚙ button, top-right of the Hub) has an Autostart on Windows boot toggle. When enabled, the app starts with Windows the next time you sign in.
The autostart launch is the one case where the Hub does not open automatically. Sprites you had active when the app last quit come back as usual, but the Hub stays hidden in the tray — the idea is that your desktop returns to its last state quietly, without a window popping up over whatever you were about to work on.
To open the Hub after an autostart boot, left-click the tray icon.
Sprites
A sprite is one animated asset running on your desktop. You can have many on screen at once, mix and match from your library, and tune each one independently — size, opacity, playback speed, click-through.
This chapter covers spawning and closing sprites, dragging, the per-sprite options panel, sizing modes, and the per-sprite right-click menu.
Spawning and closing a sprite
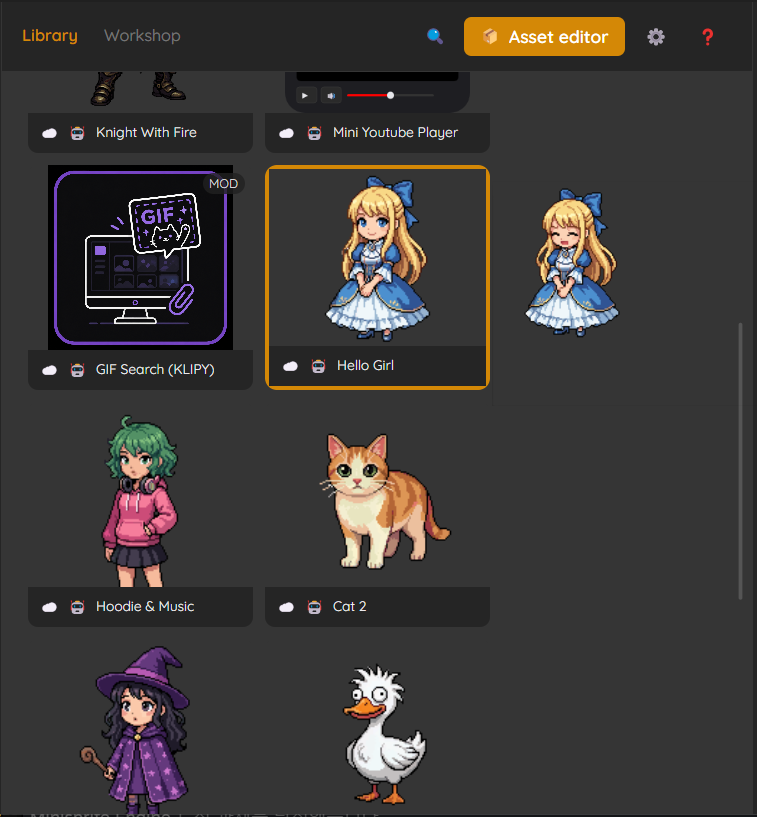
The Library tab in the Hub lists every sprite available to you: built-ins, your own packaged assets, and anything subscribed from the Workshop.
- Click a card once → the sprite appears on your desktop.
- Click the same card again → the sprite closes. Each card is a toggle.
Spawning a sprite that's already on screen does nothing — use the toggle to close it, or use the per-sprite menu.
You can have any number of different sprites active at the same time. Activating ten cards spawns ten sprites side by side. Memory and CPU usage scale linearly with the active count.
Dragging a sprite
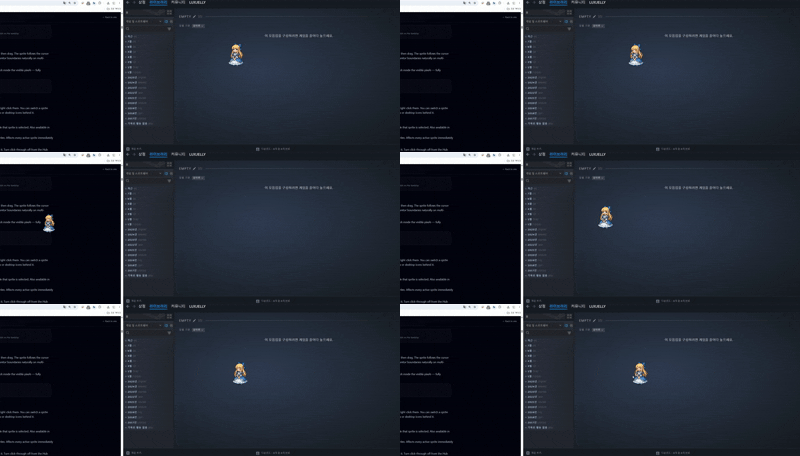
Click and hold the left mouse button anywhere on the sprite, then drag. The sprite follows the cursor until you release. Standard window dragging — it crosses monitor boundaries naturally on multi-monitor setups.
If a sprite is hard to grab because it has transparent areas, click inside the visible pixels — fully transparent regions are click-through.
Click-through (mouse pass-through)
By default, sprites receive mouse clicks so you can drag and right-click them. You can switch a sprite to click-through so the mouse passes through to the window or desktop icons behind it.
Two ways to set it:
- Per sprite: Hub right panel → Click-through checkbox while that sprite is selected. Also available in Settings as "default for new sprites".
- Globally: Settings → Interaction → Click-through for all sprites. Affects every active sprite immediately and becomes the default for new ones.
When a sprite is click-through, you can't drag it or right-click it. Turn click-through off from the Hub right panel or Settings to interact with it again.
The Hub right panel — per-sprite options
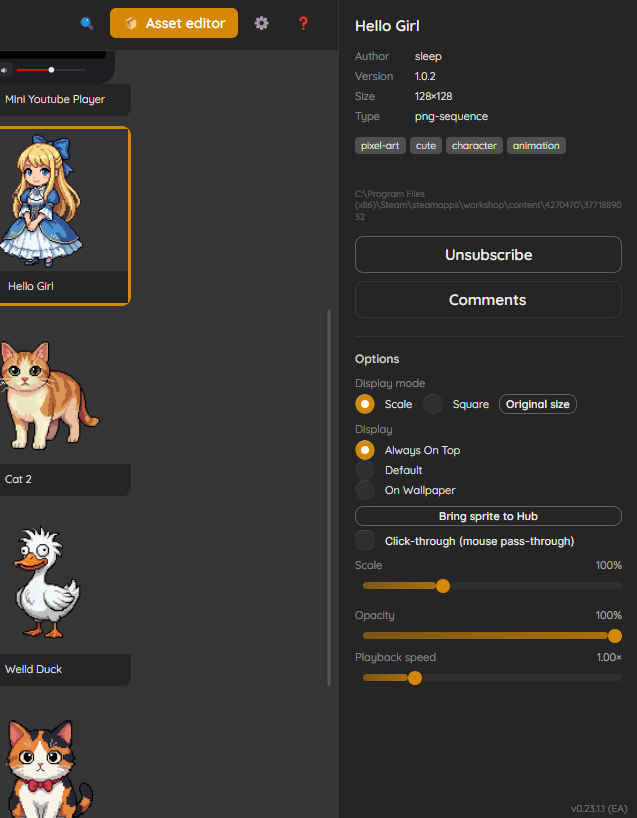
Selecting a card in the Library tab shows its options on the right side of the Hub. Some options apply only when the sprite is active.
- Display mode — how the sprite is sized on screen. See the next section.
- Square size — appears when Display mode = forced square.
- Scale — appears when Display mode = scale (%).
- Original size — quick reset button. Equivalent to Scale = 100 %.
- Opacity — 0–100 %. Independent per sprite.
- Playback speed — animation playback rate. 1.0× is the asset's authored rate; 0.5× is half speed, 2.0× is double.
- Bring sprite to Hub — for a sprite that's currently active, moves it back next to the Hub window. Use it to recover a sprite that drifted off-screen or ended up behind other windows.
- Click-through — see above.
The panel also has a Display group (Default / Always On Top / On Wallpaper) — that's covered in the Display Modes & Wallpaper Mode chapter. Changes apply live. There is no Apply button.
Display modes
Two modes for how a sprite is sized on your desktop:
- Scale (%) — keeps the aspect ratio and resizes to a percentage of the asset's authored size. 100 % = the original pixels, 50 % is half, 200 % is double. This is the default.
- Square — fits the sprite into a square of a fixed pixel size (32, 64, 128, 256, or 512). Non-square assets are letterboxed.
There's also an Original size button in the right panel that's a quick shortcut for "Scale mode, 100 %" — handy for getting back to the authored dimensions after experimenting with other values.
Size, opacity, speed, and mute state are all saved per card. They come back whether you just closed and reopened that one sprite or restarted the whole app — each sprite returns exactly as you last set it, even if it wasn't active when you quit.
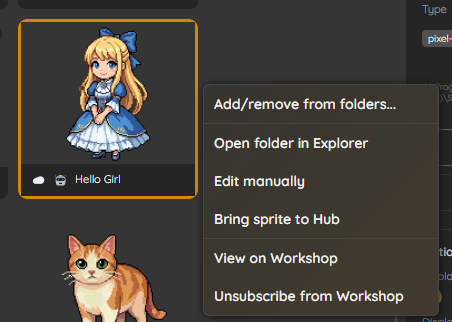
Library card right-click menu
Right-clicking a card in the Library tab gives a context menu. Highlights:
- Folders ▶ — your custom organization (see the Workshop chapter for how folders interact with subscribed items).
- Bring sprite to Hub — for a sprite that's currently active, moves it back next to the Hub window. Use it to recover a sprite that drifted off-screen or ended up behind other windows.
- Open folder in Explorer — opens the asset's location on disk. Useful for inspecting what was packaged or for manual edits.
- Edit manually — opens the asset's
manifest.jsonin your default text editor. Advanced. - Publish to Workshop — for your own draft assets. The full Workshop upload flow is covered in the Asset Editor chapter.
- View on Workshop — for assets subscribed from the Workshop. Opens the Steam page in the external browser.
- Unsubscribe from Workshop — removes a subscribed asset. A confirmation dialog warns that the local files are deleted and a re-download is required if you subscribe again.
- Mark this mod as trusted / Remove trusted mark — for assets that include a mod (
.dll). See the Mods chapter. - Delete local asset — permanent local removal. A confirmation dialog is required.
Per-sprite right-click menu
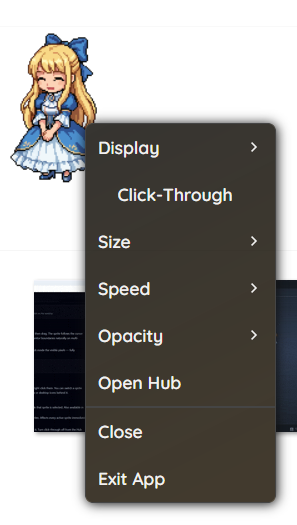
Right-clicking the sprite itself (not a card) gives a smaller menu focused on the running instance:
- Open Hub — bring the Hub to the front.
- Close — close this sprite.
- Exit App — quit Minisprite Engine entirely.
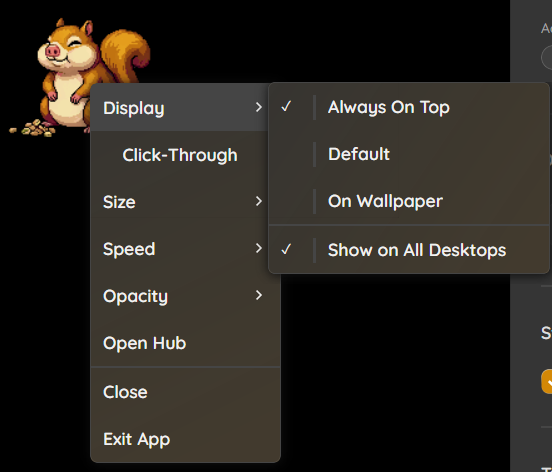
- Display — where the sprite sits in the window stack (Default / Always On Top / On Wallpaper), plus Show on All Desktops and, in wallpaper mode, fill options. See the Display Modes & Wallpaper Mode chapter.
- Size — same square sizes as the Hub right panel. The current size has a ✓ next to it.
- Speed — playback rate. The current speed has a ✓ next to it.
- Opacity — quick access without opening the Hub.
For sprites with attached mods, the mod's own menu items appear in the same right-click menu (for example, a calculator sprite shows calculator controls).
Tray submenu for sprites
The Windows tray icon also has a Sprites ▶ submenu listing every active sprite by name, with quick per-sprite toggles:
- Show Sprite — temporarily hide a sprite without closing it.
- Click-Through — toggle click-through.
- Always Top — force this sprite to stay above all windows.
- Mute audio — silence this sprite's sound (video audio or an attached music track) without closing it.
- Close — close just this one.
Use this when sprites are hidden behind other windows and you can't right-click them directly.
Workshop
The Workshop tab is where you find sprites made by other users and add them to your library. Every subscribed asset is downloaded by Steam automatically and shows up in the Library tab side by side with your built-in sprites and your own packaged drafts.
This chapter covers searching, the asset detail panel, subscribe / unsubscribe / update flows, the filter toggles, and how user folders and Steam Cloud sync work.
Opening the Workshop tab
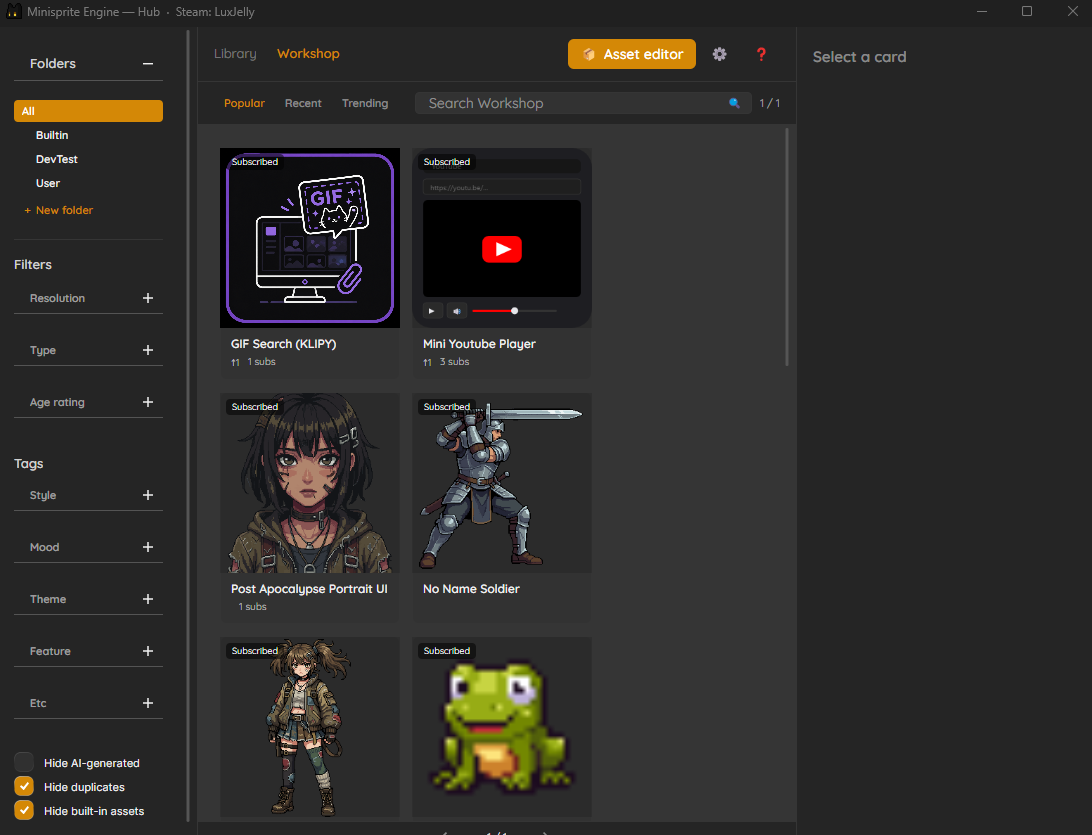
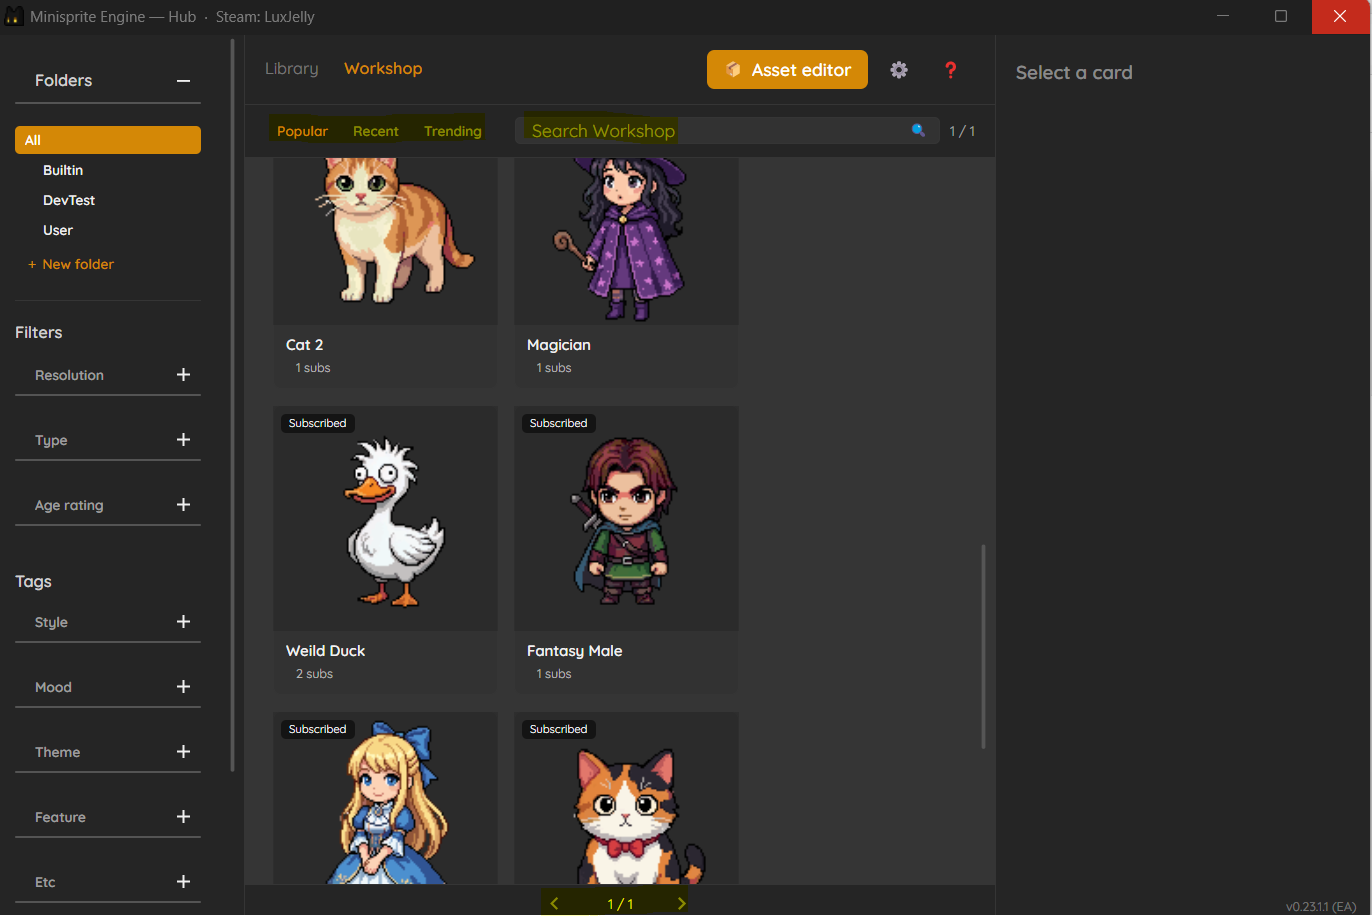
Click the Workshop tab at the top of the Hub. The tab loads the default sort (Popular) and shows the first page of results.
Every time you enter the Workshop tab, the query runs again — so you see fresh results without having to refresh manually. To force a re-query at any time, press F5 while focused on the Workshop tab. The Library tab also responds to F5 (reloads asset manifests from disk; useful when you've edited manifest.json externally).
Searching and sorting
The Workshop tab has three controls along the top:
- Search Workshop — text input. Type a query and press the Search button (or Enter). The search applies on top of the current sort.
- Sort — three tabs (Popular / Recent / Trending), shown in a row — click one to switch:
- Popular — top-rated assets over time.
- Recent — newest first.
- Trending — assets gaining subscribers right now.
- Pagination — current and total page numbers (
{N} / {Total}). Use the prev / next arrows to move between pages.
Switching sort or running a new search resets to page 1.
If the Workshop search service is unavailable, a yellow banner appears: "Workshop search unavailable — showing only your published items." This is a graceful fallback that shows just the items you've published yourself, so the tab is never empty for you.
The asset detail panel
The right side of the Hub shows a detail panel for whichever card you last clicked. The panel content depends on which tab you're in.
From the Workshop tab
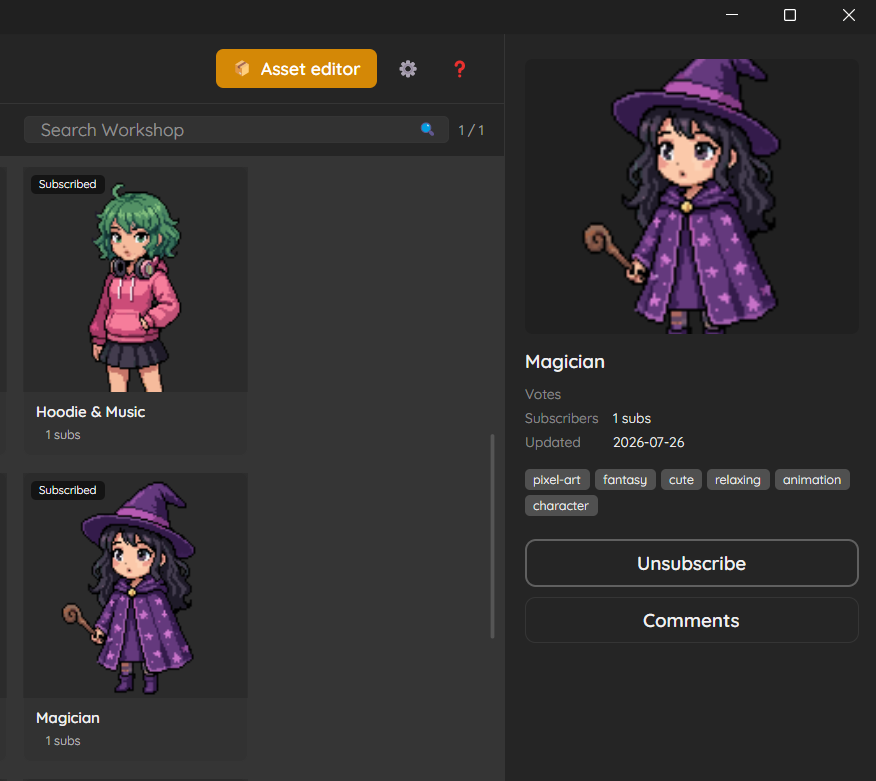
Clicking a search-result card opens the full Workshop detail panel:
- A large preview image.
- The asset's title, description, and tags.
- Subscribers — how many users currently have it installed.
- Votes — community rating count. May be blank for assets without rating data.
- Updated — last-updated date. May be blank for assets without a server-side timestamp.
- Action buttons (some appear conditionally):
- Download — for assets you don't have yet. Click to subscribe; Steam downloads in the background.
- Update now — only when an update is available (see "Update detection" below).
- Unsubscribe — for assets you've already subscribed to. Confirmation warns that local files are removed and a re-download is required to subscribe again.
- Comments — opens the asset's Steam page in your default browser.
From the Library tab (Workshop-sourced cards)
Selecting a library card that came from the Workshop shows a smaller panel — you already own it, so the preview / votes block isn't repeated. You get:
- The asset's tags.
- The local folder path.
- Update now — only when an update is available.
- Unsubscribe.
- Comments.
Mod-bearing cards add Trust this mod / Remove trusted mark buttons here as well (see the Mods chapter).
Downloading and subscribing
When you click Download on a Workshop asset:
- The card on the grid dims and shows a horizontal progress bar with a
X.X / Y.Y MBoverlay. - Steam downloads the files in the background. You can keep browsing — downloads don't block other actions.
- As soon as the download finishes, the asset appears in the Library tab automatically. No restart, no manual refresh.
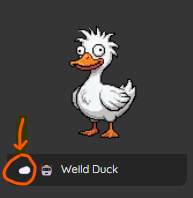
A small Subscribed badge in the top-left corner of the card marks every asset you currently have installed, both in the Workshop tab and after the asset arrives in the Library.
Unsubscribing
Two ways to unsubscribe:
- From the Workshop tab — select the card, click Unsubscribe in the right panel.
- From the Library tab — right-click the asset's library card → Unsubscribe from Workshop.
Both paths show the same confirmation dialog. Unsubscribing removes the local files; the asset disappears from your Library immediately. Steam may take a moment to reflect the unsubscribe across other PCs sharing your account.
Update detection
Minisprite Engine watches Steam for new versions of your subscribed assets while the app is running. By default, updates download automatically in the background; you can switch to manual control in Settings.
Automatic mode (default)
When Steam marks a subscribed asset as having a new version, the app downloads it on its own. You don't have to click anything.
- If no sprite from that asset is running, the download starts right away. A single shared toast shows "Update started: {title}". If multiple assets update at once, the toast updates in place with whichever title started most recently — it doesn't stack.
- If a sprite from that asset is currently active on the desktop, the download is held back so the sprite doesn't get yanked out from under you. The card still shows the ⬆ UPD badge. Close the sprite (Hub right panel → ✕) and the update applies automatically on the next check.
- On completion, the card's metadata (title, tags, preview) refreshes from the new
manifest.jsonwith a "Updated: {title}" toast.
If Steam isn't running or the download fails, you'll see "Update failed: {title}" or "Steam unavailable" — the app retries on its next check.
Manual mode (opt-in)
Toggle on Settings → Workshop → Receive workshop updates manually if you'd rather be the one who decides when updates land — handy on metered connections, or if you don't want background bandwidth.
In manual mode:
- The ⬆ UPD badge appears in the top-right of the library card whenever an update is available.
- The right panel for the asset gains an Update now button.
- Nothing downloads until you click it.
Click Update now to start the download. If a sprite from that asset is active, it closes automatically before the download begins (running files are about to change). A progress overlay appears on the card; the completion toast and metadata refresh are the same as automatic mode.
Filters and the "Hide ..." toggles
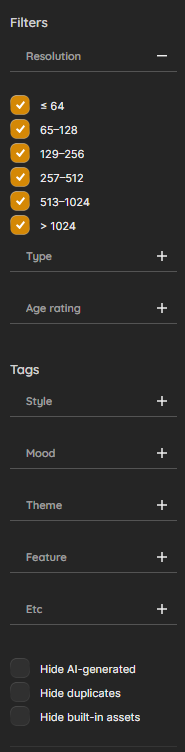
The left sidebar of the Library tab has filters that apply to whatever's visible — including Workshop assets after they download:
- Resolution — small / medium / large size buckets.
- Type — PNG sequence / GIF / Aseprite / Video.
- Age rating — Everyone / Questionable / Mature.
- Tags — multi-select category tags.
Plus three boolean toggles that affect what shows up:
- Hide AI-generated — hides assets the publisher reported as AI-generated. (Self-reported by the modder; there's no enforced verification.)
- Hide duplicates — if the same asset exists both as your local copy and as a Workshop subscription, only the Workshop version shows. Useful if you've subscribed to your own published asset and don't want to see two cards for it.
- Hide built-in assets — hides the sprites and mods bundled with the app (Calculator, Calendar, and the rest). They stay installed; this just clears them out of the grid so you can focus on your own and subscribed content.
Filters and toggles are remembered across launches.
User folders and Steam Cloud sync
Folders are a way to group cards in the Library tab — your own custom organization layered on top of the library. Built-ins, Workshop subscriptions, and your own drafts can all go in the same folder.
Folder operations (in the Library tab's left sidebar):
- + New folder — creates a top-level folder.
- Right-click a folder — Rename, Delete, or New sub-folder. Sub-folders can be nested.
- Right-click a card → Folders ▶ — assign a card to one or more folders, or remove it from the current folder.
Deleting a folder removes only the group — the assets inside stay in the library. If a folder has sub-folders, the confirmation dialog calls that out.
Steam Cloud sync
Your folder layout syncs across all PCs where you're signed into Steam. The state shows in the small label at the bottom-left of the Hub sidebar:
- ☁ Synced — Cloud is reachable and your local state is up to date.
- ☁ Pulled remote changes — Cloud had newer folders from another PC; they've been merged into this PC.
- ☁ Offline — Steam isn't running, or Cloud is disabled for the app. Folder edits stay local; they'll sync the next time Steam comes online.
- ☁ Sync failed — Cloud is reachable but the write failed. Folder edits stay local. Restarting Steam usually fixes it.
Hovering the badge shows the tooltip "User folders sync via Steam Cloud across PCs. When Steam is not running or Cloud is disabled, local-only."
Cloud sync covers user folders only — the active sprite positions, sizes, opacity, and other per-instance state are saved locally on each PC.
Asset Editor
The Asset Editor packages your own images, animations, or videos into a sprite. You can keep drafts locally, save them as Hub library cards, or publish them to the Steam Workshop where other players can subscribe.
This chapter covers every part of the editor: drafts, the metadata form, media import (all five supported formats), sprite sheet slicing, alpha key transparency, mod-only drafts, auto-save, and the full Workshop publish flow.
Opening the editor
Two ways:
- Hub — the Asset editor entry point in the Hub header.
- Tray — right-click the tray icon → Asset editor.
Either path opens the editor in its own window. The Hub keeps running underneath; you can switch between them freely.
On first entry, a five-step tutorial overlay appears. You can skip it at any time and replay it from the Help (❓) button in the top-right of the editor or from Settings.
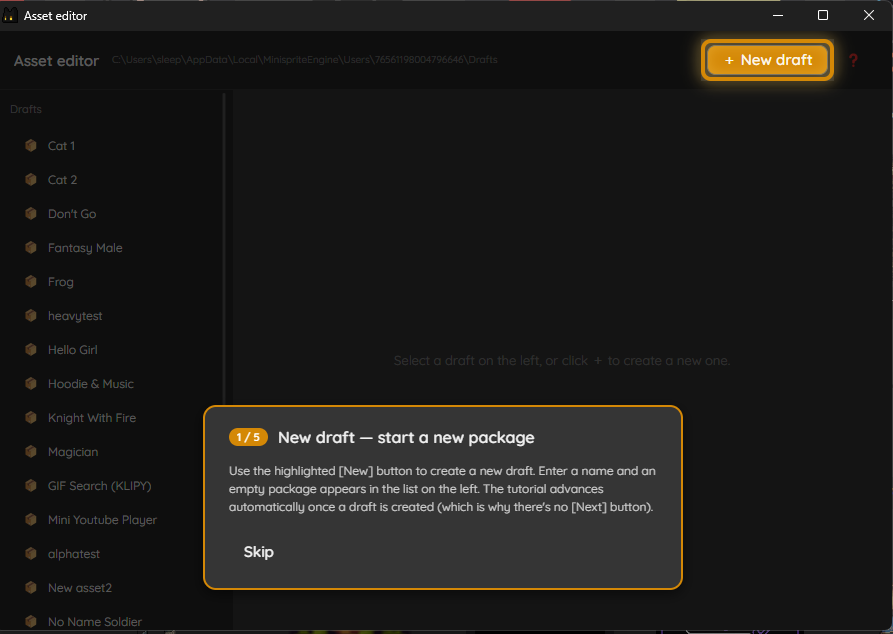
Drafts panel — creating and managing drafts
The left panel lists every draft you've started. Drafts persist between sessions; they live on disk at %LocalAppData%/MinispriteEngine/Drafts/.
- + New draft — click, enter an asset title, and an empty package appears in the list with the form on the right ready to fill in.
- Select a draft — click any draft in the list to load it into the form on the right.
- Delete draft — the trash button on each draft. A confirmation dialog warns this is permanent and cannot be undone.
If the list is empty, the right side shows a placeholder asking you to click + to create one.
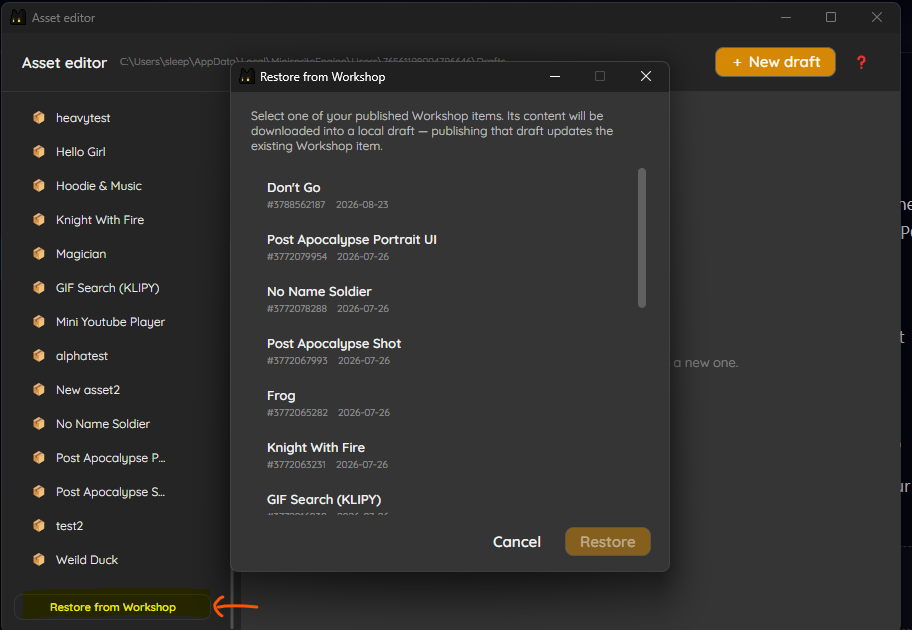
Restore from Workshop
The Drafts panel also has a Restore from Workshop button. It downloads one of your own published Workshop items back into a local draft — so you can keep updating an item even after switching PCs or losing your local files.
Click it and a dialog lists your published Workshop items. Pick one, click Restore, and its content downloads into a new draft. Because the draft keeps the item's Workshop identity, publishing that draft updates the existing Workshop item instead of creating a duplicate.
- If a draft with the same id already exists, an overwrite confirmation appears first.
- If you haven't published anything yet, the dialog says "You have no published Workshop items."
- If the download fails (Steam offline, connection issue), a toast tells you to check Steam and your connection and try again.
The metadata form
When a draft is selected, the right panel shows its metadata form. Every field except Title is optional.
| Field | Notes |
|---|---|
| Title | Required to save and to publish. Shown on the Hub card and the Workshop page. |
| Author | Your display name. Defaults to your Steam handle. |
| Version | Free-form. 1.0.0 style is convention. Auto-bumped on publish if the checkbox is on (see below). |
| Description | Free-form. Shown verbatim on the Workshop page. |
| Tags | Comma-separated. Used by the Hub filter sidebar. |
| Age rating | Everyone / Questionable / Mature. |
| AI-generated content | Check if AI tools were meaningfully used. Users with Hide AI-generated on won't see your asset. |
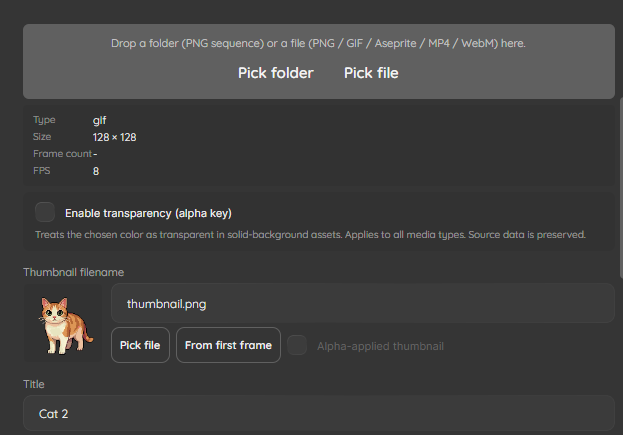
| Thumbnail filename | Defaults to thumbnail.png. Use Pick file to choose a different image, or From first frame to re-extract from the current media. |
| Audio | Optional BGM (see "Audio" below). |
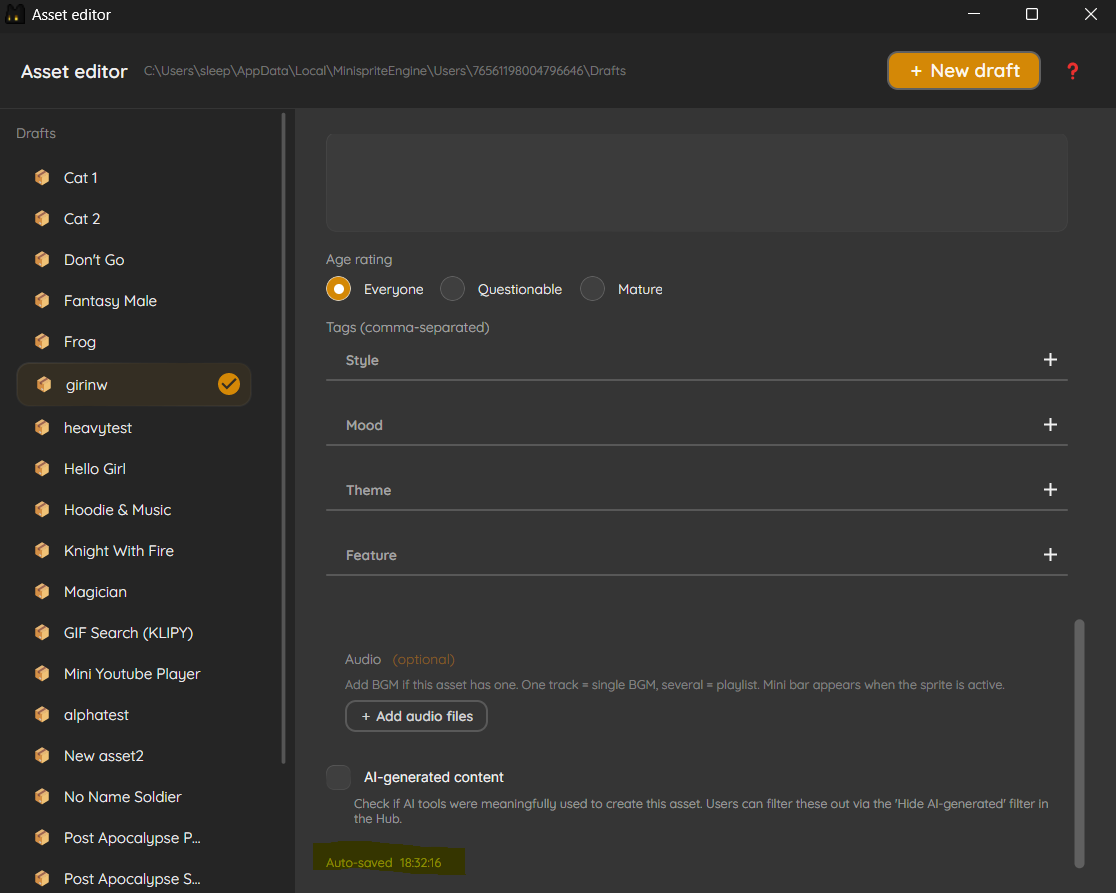
An Auto-saved label appears after each save. Edits are committed with a 1-second debounce — you don't need to press anything.
If auto-save ever fails (disk full, file locked), a toast at the top reads "Auto-save failed: {reason}". Check %LocalAppData%\MinispriteEngine\debug.log for details.
Media — importing your animation
The Media section is where you bring in the actual frames. Five formats are supported:
- PNG sequence — a folder of numbered PNGs (
0001.png,0002.png, ...). - Single PNG (sprite sheet) — one PNG that you slice into a grid (see below).
- GIF — a single animated GIF.
- Aseprite —
.asepritefile. Layer blending, linked cels, and loop tags are honored. - Video — MP4 or WebM. Alpha is supported in WebM with the yuva420p pixel format.
Three ways to import:
- Drop — drag a folder (PNG sequence) or a file (any other format) onto the Media drop zone.
- Pick folder — opens a folder picker for PNG sequence import.
- Pick file — opens a file picker for everything else.
After import, the Media section shows the detected Type, pixel Size, FPS, and Frame count.
For a PNG sequence, the FPS field is editable (1–120) — a folder of PNGs carries no timing of its own, so you set the playback rate here. For GIF, Aseprite, and video, FPS is read-only because the frame timing is baked into the source format.
Large file warning
When you import a large non-video asset — a big PNG sequence, GIF, or Aseprite file whose estimated decoded size crosses the ~250 MB caution threshold — the editor shows a confirmation before decoding: "This media will use about {N} MB of memory once loaded. Importing will take a moment. Proceed with import?" Continue to proceed, or cancel and pick a smaller source.
Video files (MP4 / WebM) skip this check. They play through a streaming decoder, so a large video doesn't load frame-by-frame into memory the way an image sequence does — importing even a multi-GB video goes straight through without the estimate dialog.
Either way, a heavy asset is flagged on the Hub card itself with a ⚡ badge once it's packaged — a caution level (~250 MB) and a higher risk level (~600 MB). See the Troubleshooting chapter for what the ⚡ badge means and how to handle a sprite that stutters or freezes on activation.
Sprite sheet slicing (single PNG → frames)
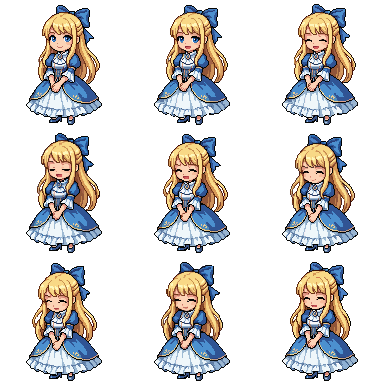
If you import a single PNG that contains a grid of animation frames, the editor offers a Sprite sheet slicing section:
- Columns / Rows / FPS — the grid dimensions.
- Apply slicing — slices the sheet into individual frames and repackages as a PNG sequence.
The original sheet is preserved on disk (data.minisprite in the draft folder), so you can change the cols / rows / FPS and re-apply any time. Total frame count is rows × columns — trailing empty cells on the bottom row are included as blank frames; trim those out of the sheet itself before slicing if you don't want them.
Manifest mismatch — auto-fix
The manifest stores width / height / frames / fps for the sprite. If you edit manifest.json manually and those values drift from what the media actually contains, a warning bar appears on re-open: "Manifest values don't match".
Click Auto-fix with actual values to overwrite the manifest with what the decoder measured. Always safe; the on-disk media is the source of truth.
Alpha key (transparency)
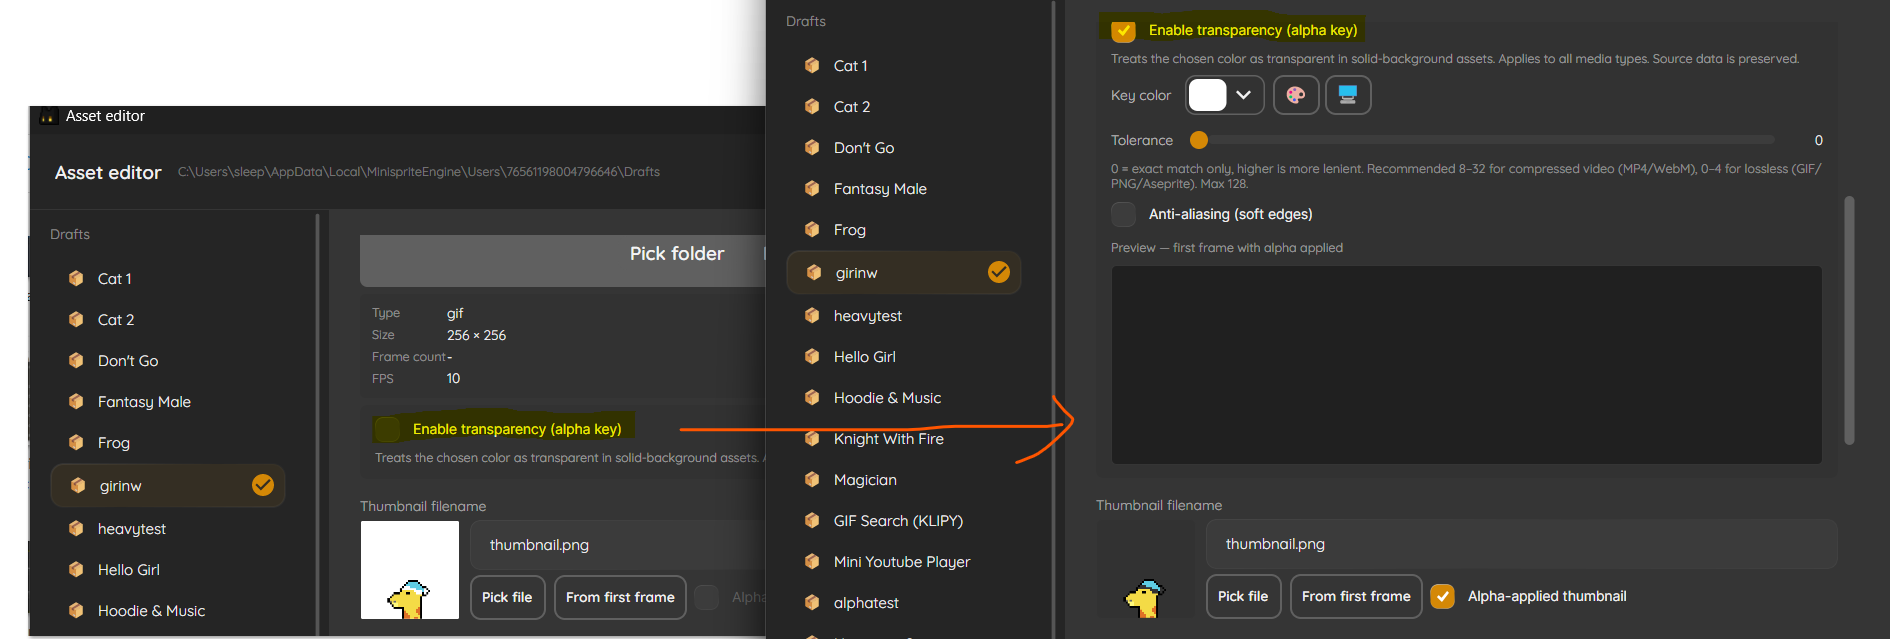
For media without a real alpha channel (most MP4/WebM, GIFs with a solid background), you can turn a specific color transparent.
- Enable transparency (alpha key) — toggle the section on.
- Key color — the color treated as transparent. Pick from:
- Pick from media — eyedropper on the current first frame.
- Pick from screen — eyedropper anywhere on screen, even outside the app. Left-click to apply, right-click or ESC to cancel.
- Tolerance — 0 = exact match only, higher is more lenient. Suggested: 8–32 for compressed video (MP4/WebM), 0–4 for lossless formats (GIF / PNG / Aseprite). Max 128.
- Anti-aliasing (soft edges) — fades pixels near the threshold instead of binary on/off. Reduces jagged edges around the alpha cutoff.
- Preview — first frame rendered with the current settings.
The source media is preserved unchanged on disk; alpha key is applied at playback time. You can also save the alpha-keyed first frame as the thumbnail via Alpha-applied thumbnail under the thumbnail section.
Bake alpha into video (advanced)
Because the alpha key is normally applied every frame at playback, a very large video pays a small CPU cost for it continuously. For video assets, the alpha key section has an Advanced area with a Bake alpha into video button. It converts the video to a real transparent format (VP9-alpha), so the transparency becomes part of the file itself:
- After baking, the manifest's alpha key is cleared — the video is transparent on its own.
- Useful for cutting the per-frame CPU cost on very large videos, and for distributing a stable, self-contained transparent video on the Workshop.
- It takes time and is not reversible, so keep a copy of your source if you might want to re-key it later.
Audio (BGM)
Drafts can ship optional background music.
- + Add audio files — multi-select an MP3 or other audio file. Add several to make a playlist.
- Remove this track — per-track button on the list.
Behavior at runtime:
- One track = plays as a single BGM with the sprite.
- Several tracks = a playlist; the music mini bar appears when the sprite is active.
The Music Player chapter covers the mini bar and magnetic mode in detail.
Mod-only asset (no animation)
Some assets are pure logic — calculator, sticky note, pomodoro — with no sprite frames. Check Mod-only asset (no animation) to mark the draft as a mod-only package.
When checked:
- The Media and Alpha key sections become disabled.
- The Thumbnail section stays editable — you can still pick a custom image to represent the mod on the Hub card.
- The manifest's
Modfield is filled with a placeholder filename. - A 📁 Open draft folder in Explorer button appears so you can drop the compiled
.dllinto the draft folder yourself.
You build the .dll in an external IDE (Visual Studio, Rider, or dotnet build). The full flow is documented in the For Modders chapter.
Target engine version (advanced)
A small Target engine version (advanced) text field appears near the bottom of the form while Mod-only asset is on. It controls the targetEngineVersion field that the manifest records.
- Empty (default) — on publish, the current engine version is stamped into the manifest automatically. Users on the same major and minor engine version see no warning; users on a different major or minor version see the ⚠ VER mismatch badge described in the Mods chapter. Patch and bugfix differences only surface as a quiet one-liner in the sidebar.
- Filled in — your value is published as-is. Override only if you've tested the mod on a different engine version and want to certify it as compatible with that version. Common case: a refactor that doesn't actually break any prior version, so you pin the value to an earlier release.
Leave it empty unless you have a specific reason. The automatic stamp is what gives users the most accurate compatibility signal.
Saving — auto-save and Save to local
Three save concepts:
- Auto-save is on by default. Edits to any form field commit to disk after a 1-second debounce. The Auto-saved label confirms each commit.
- Save to local — copies the entire draft to the app's local asset folder so it appears as a regular Hub card. Use this when you want to use your asset yourself without publishing it. A toast confirms: "Saved locally: '{title}'". If a local asset with the same id already exists, an overwrite confirmation appears.
- Delete draft — the trash button in the Drafts panel removes the draft folder permanently.
Publishing to Workshop
Once the Title and Media are set, the Publish to Workshop button becomes active. If either is missing, a warning bar shows above the button: "⚠ Title is empty — cannot publish to Workshop" or the equivalent for media.
The publish flow
- Confirm dialog — "Publish '{title}' to Steam Workshop. The entire asset folder and preview image will be uploaded. For a new submission, you may need to accept the Steam Community Workshop terms first. Continue?"
- Publish options dialog — appears after the confirm:
- Changelog — multiline text. Recorded as Steam release notes. Defaults to "Updated".
- Auto bump version (patch +1) — checkbox. Increments the last component of the version field. Uncheck to publish the current version as-is.
- Rights confirmation — a required checkbox: "I own or have permission to use all media in this upload, and I take full responsibility for any copyright issue." The Publish button stays disabled until you tick it.
- Publish — submits.
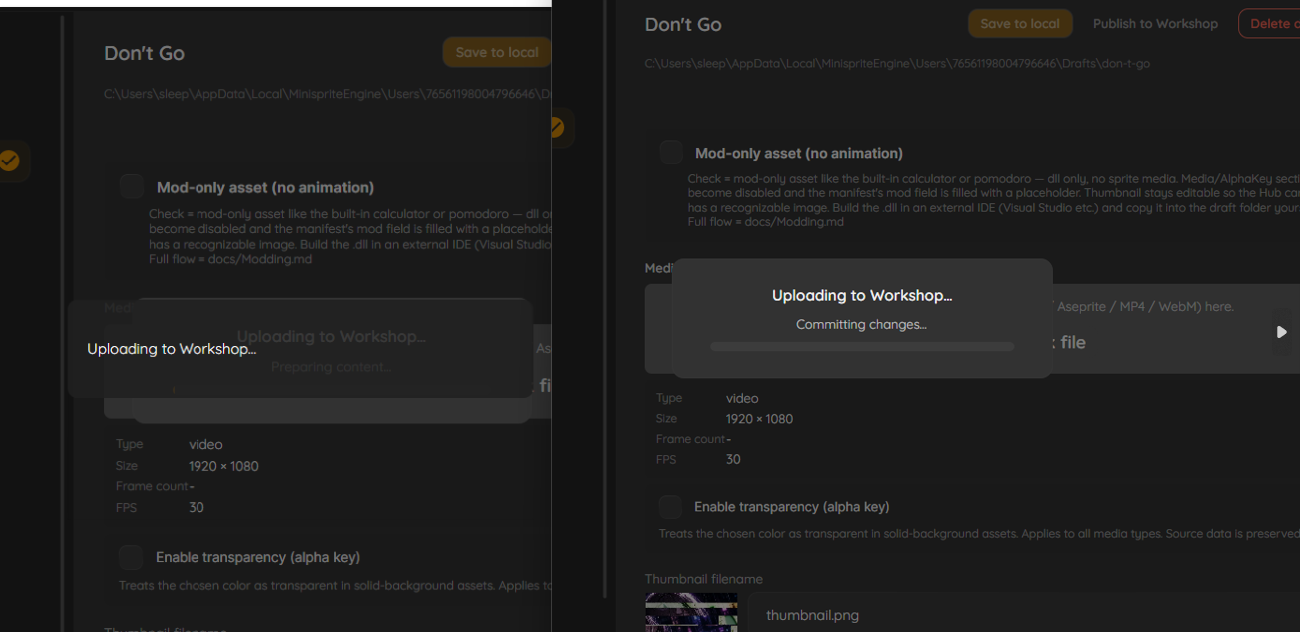
- Progress overlay — an opaque overlay covers the editor with the current stage label: Preparing config…, Preparing content…, Uploading content…, Uploading preview image…, Committing changes…
- Success — toast: "Workshop publish succeeded (id {N})". Steam unlocks the first publish achievement on your first successful upload.
Auto-subscribe to your own asset
After a successful publish, the app silently subscribes your Steam account to the new asset. This means it shows up on any other PC you sign into immediately, without you needing to subscribe manually. The auto-subscribe is silent — no toast — because the publish success toast already covered the user-facing news.
Preview image auto-resize
Steam's preview image limits are 1024 × 1024 pixels and 1 MB. If your thumbnail is larger:
- The image is resized down preserving aspect ratio.
- PNG is tried first; if still over 1 MB, JPG at quality 85 is used as a fallback.
- A toast confirms: "Preview image auto-resized (W×H, {KB} KB) — fits Steam recommendation".
The source thumbnail in your draft folder is not modified. The resize happens to a temporary copy used only for the upload.
Publish errors
- Steam not running — "Steam is not running. Start Steam and try again."
- Terms not accepted — "You need to accept the Steam Community Workshop terms first. Accept the terms in your browser and try again." (Steam opens a browser window automatically on first publish.)
- Mod file missing — if the manifest's
Modfield references a.dllthat isn't in the draft folder, a dialog asks "Publish anyway?" — useful for placeholder-only mod drafts.
Where drafts live on disk
%LocalAppData%/MinispriteEngine/Drafts/<draft-id>/
├── manifest.json
├── data.minisprite   (packed media — present after media import)
├── thumbnail.png     (or other filename you chose)
└── mod.dll           (only for mod-only drafts you built externally)
Browsing this folder is what 📁 Open draft folder in Explorer does. Editing manifest.json here directly works — the editor re-reads on focus, and the auto-fix bar handles any mismatches.
Mods
A mod in Minisprite Engine is a sprite asset that ships a small .dll for extra interactive behavior. Mods can be anything from a working calculator to a microphone-reactive sprite to a mini-game. This chapter covers what mods are, the trust model, the six built-in mods, and what happens when something goes wrong.
If you want to write your own mods, see the For Modders chapter.
What's a mod?
Regular sprites just animate — a GIF, a PNG sequence, a video. A mod adds logic on top: state that persists, UI controls, sound input, mini-game rules, anything a small piece of code can do.
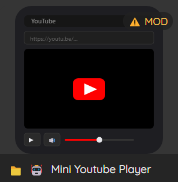
You can tell at a glance whether a card is a mod by the Mod tag in the right panel, or by the ⚠ MOD badge on the card itself if the mod is from an external source (see "The trust toggle" below).
Mods can also ship sprite media — Lippy is a sprite and a mod combined — or have no media at all (the calculator and pomodoro are pure UI with no animation).
The ⚠ MOD badge and the trust model
Minisprite Engine uses a trust-based security model for mods rather than a sandbox. There's no real sandbox available for .NET desktop code, so the policy is: warn before running anything you didn't write yourself.
A card shows the ⚠ MOD badge in the top-right when all three are true:
- The asset includes a
.dll(theModfield in the manifest). - It's not a built-in mod (built-ins are always trusted).
- You haven't marked it as trusted yet.
Built-in mods never show the badge — the six bundled with the app ship with the engine and are considered trusted by definition.
Trusting a mod
If you trust the source — you've read the description, you know the author, you understand what the mod claims to do — you can mark it as trusted:
- Right-click the card → Mark this mod as trusted, or
- Hub right panel → Trust this mod when the card is selected.
A confirmation dialog appears: "External mods may contain features that cannot be trusted. Do you really want to mark this mod as trusted?" Click yes, and:
- The
⚠ MODbadge disappears from the card. - The run-time confirmation is skipped — the mod activates immediately when you click the card.
Removing a trusted mark
If you change your mind:
- Right-click the card → Remove trusted mark from this mod, or
- Hub right panel → Remove trusted mark.
Confirmation: "Remove the trusted mark for this mod? The ⚠ MOD warning will return and the run-time confirmation dialog will be shown again." The mod still works — only the trust state changes.
Running an untrusted mod
If you click a card that's still untrusted, you get the run-time confirmation dialog:
Run untrusted mod?
This mod is not yet marked as trusted. External mods may contain features that cannot be trusted. Do you really want to run it?
Click Yes to run this one time without marking it as trusted. The dialog reappears the next time. Click No to cancel — no sprite spawns, no .dll is loaded.
This is the friction point. It's deliberately annoying so you notice each new mod the first time you run it.
The ⚠ VER badge and engine compatibility
A second warning system runs alongside trust — engine version compatibility. The engine API can change between releases; a mod built against an older version might depend on something that's gone, and a mod built against a newer version might call something that doesn't exist yet.
The card shows a red ⚠ VER badge in the top-right when a mod might be incompatible with the engine version you're running. It sits next to the MOD and UPD badges — multiple badges stack horizontally.
Two situations trigger the badge:
- Legacy mod (no version recorded). The mod's
manifest.jsonhas notargetEngineVersionfield — it was published before the version-tracking system existed, or the modder edited the manifest by hand and removed the field. Hover tooltip: "This mod has no engine version info." - Major or minor version mismatch. The mod records a
targetEngineVersionwhose major or minor part differs from the running engine — e.g. mod built for v0.12.x running on v0.13.x. This is the band where API changes are most likely. The check fires in both directions (newer-than-current and older-than-current). Hover tooltip: "Built for engine v{mod}. Current: v{app}. Compatibility not guaranteed."
Selecting the card shows the same message as a red info panel in the right-hand sidebar, in case the tooltip is hard to read.
Patch / bugfix differences — quieter signal
If the mod's targetEngineVersion matches on major and minor but differs only in the patch or bugfix segment (e.g. mod built for v0.13.10.0 running on v0.13.13.0), no red badge appears. Patch and bugfix releases rarely change the mod API surface, so flagging every drift would be noise.
Instead, when you select the card, the right-hand sidebar shows a small grey one-liner: "Engine v{mod} · current: v{app}". It's informational — no warning tone, no compatibility claim either way.
What happens when you run it
Nothing special. The badge is a passive warning — no extra confirmation dialog before activation. If the engine drift turns out to matter, the mod will fail to load and you'll see the standard "Mod failed to load" toast. If the drift doesn't matter, the mod works fine despite the warning.
The two cases the badge covers — legacy unknown, version drift — are about probability, not certainty. Many mods built for older engine versions still work today, especially the simple ones.
Built-in mods are always exempt
Built-in mods (the six shipped with the app) are built alongside the engine, so they're guaranteed compatible. The badge never appears on them, regardless of what their manifests say.
The six built-in mods
Every install ships these. They're trusted by default and serve as both useful tools and examples of what mods can do.
Sample Calculator
A four-function calculator that floats on your desktop. Mod-only — no sprite animation; the calculator UI is the sprite.
Calendar
A monthly grid view with per-day event notes. Today's date is highlighted; days that have notes show a marker. Notes persist to disk per asset.
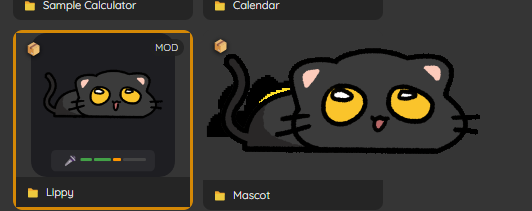
Lippy
A microphone-reactive sprite. The image swaps to a different frame while you're talking — handy for streaming, screen-recording, or just keeping the desktop alive while you take a call.
Lippy needs microphone access. The first time you spawn it, Windows may prompt for permission; if the sprite never swaps, check Windows Settings → Privacy & security → Microphone and make sure desktop apps are allowed.
Standard sprite controls (size / speed / opacity / click-through) apply. Lippy is both a sprite and a mod — it carries actual image data plus the microphone logic.
Pomodoro Timer
The classic 25-minute work / 5-minute break cycle. The timer counts down on the sprite face; today's completed cycle count is shown.
Sticky Note
A small paper note on your desktop. Type into it and it auto-saves. A 5-color palette lets you tint individual notes. Make as many as you like — each instance is independent.
Tic-Tac-Toe
A 3×3 grid where you play X against a minimax AI. Your cumulative win / draw / loss counts persist.
Mods from the Workshop
When you subscribe to a Workshop mod, it arrives in your Library the same way any other asset does. The ⚠ MOD badge appears because it's not built-in and you haven't trusted it yet. The Mod tag is shown in the right panel.
Before trusting, consider:
- Read the description and look at the author's profile.
- Check the comments on the Workshop page for reports from other users.
- If the asset includes a
source/folder, you can read the code yourself. (Modders are encouraged to ship source — the six built-in mods all do.) - If anything looks off, don't trust it. The mod will keep working if you click through the confirmation each time, but a permanent trust mark should be a deliberate choice.
When a mod fails to load
If a mod's .dll won't load — corrupted file, missing dependency, incompatible runtime — you'll see a toast at the top of the Hub:
Mod '{name}' failed to load — see %LocalAppData%\MinispriteEngine\debug.log for details
The sprite still spawns (if the asset has media), it just runs without the mod attached. The debug log has the .NET exception message and stack trace, which is what you'd send to the mod's author if you want help.
Common failure causes:
- The
.dllwas built against a newer Minisprite Engine API than this version of the app supports. - The
.dlldepends on a native library that isn't shipped with the mod. - The
.dllis from an OS architecture that doesn't match (e.g. ARM64 build on x64).
Music Player
The music player is a small floating bar that plays BGM tracks shipped with sprites or your own MP3 files. It runs alongside your sprites without occupying a Hub tab; you open it from the tray or let an audio-bearing sprite open it automatically.
This chapter covers opening the player, the mini bar controls, the playlist panel, magnetic mode (attach to a sprite), and how custom tracks persist.
Opening the music player
Three entry points:
- Tray icon → Music Player — opens a standalone player with no default tracks. Add your own MP3 files via the playlist panel.
- Activating a sprite with audio — sprites whose manifest includes audio tracks (see the Asset Editor chapter) open the music player automatically. The sprite is the owner; the default tracks come from the sprite's package.
- Re-opening after hide — if you previously closed the bar with X but the audio is still playing in the background, clicking the tray's Music Player entry brings the bar back.
There's only one music player at a time. Activating a second audio-bearing sprite while a previous one is playing closes the first and switches to the new owner's tracks.
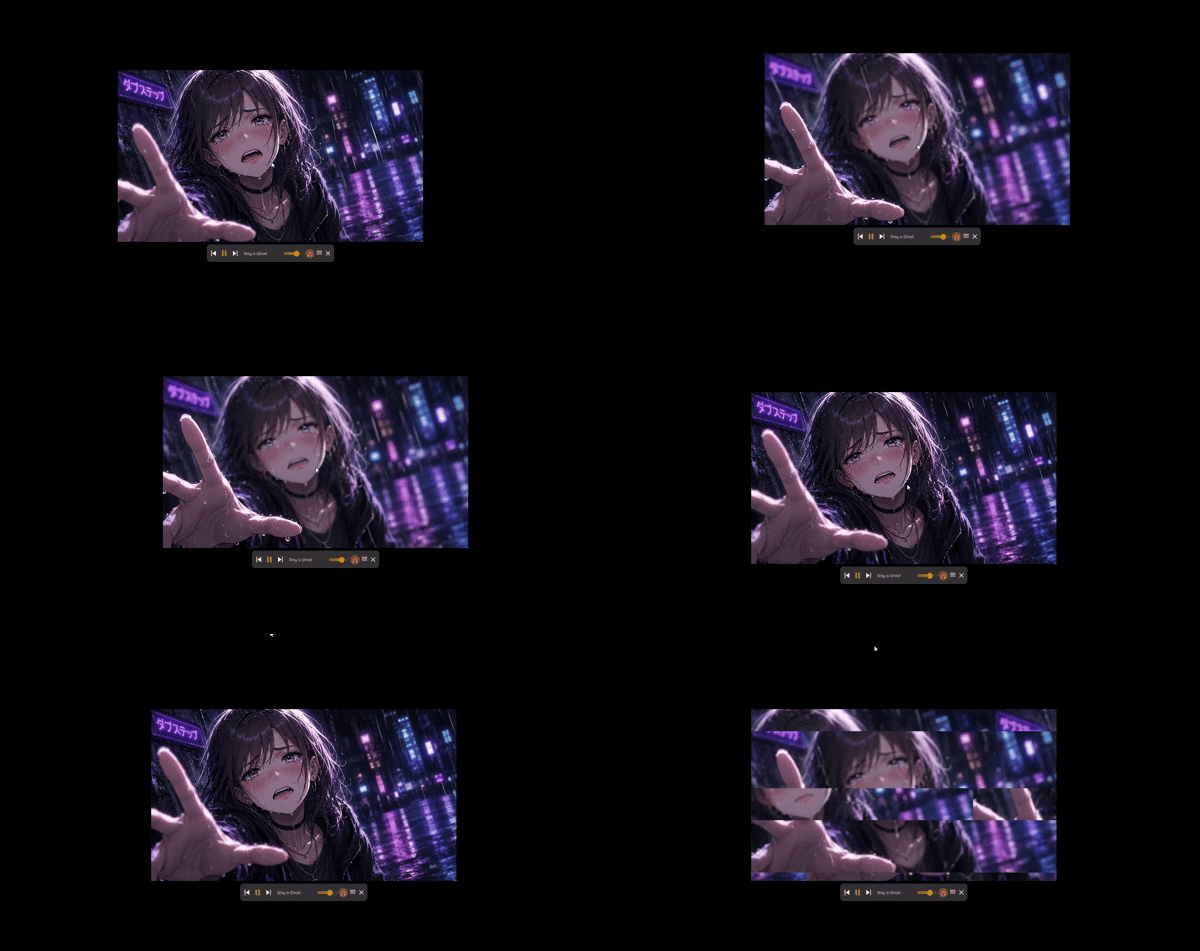
The mini bar
The bar is intentionally small — five buttons in a row, sized to sit at the bottom of a sprite.
| Control | What it does |
|---|---|
| ◄ | Previous track |
| ▶ / ❚❚ | Play / Pause |
| ► | Next track |
| 🧲 | Magnetic toggle (see below) |
| ☰ | Open / close the playlist panel |
Hovering each button shows the tooltip — Previous, Play / Pause, Next, Magnetic (attach to nearest sprite bottom), Playlist.
Closing the bar with the X button hides the bar but keeps the audio playing. To stop audio entirely, pause it first, or close the owning sprite (the audio stops with its sprite).
The playlist panel
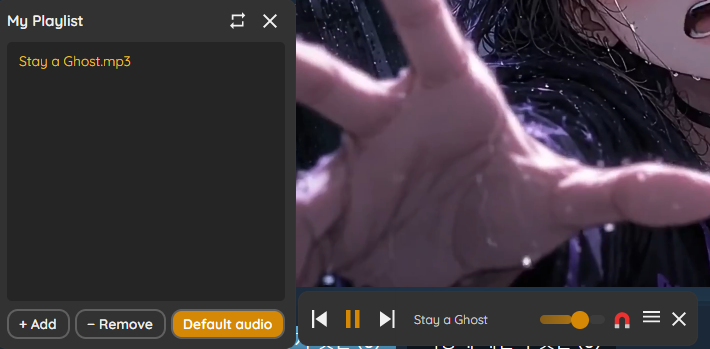
Click ☰ to open the playlist panel — a vertical list of tracks that sits attached to the bar.
The panel header reads My Playlist. Below it:
- Default track — double-click to play — appears for sprites that ship their own audio. Double-click any default track to start it.
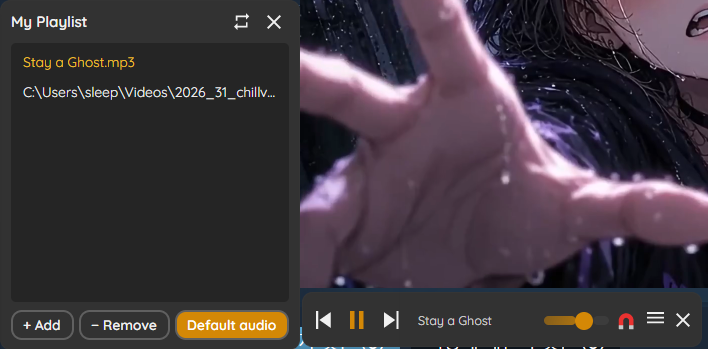
- + Add — opens an MP3 file picker. Select one or more files to append them to the playlist.
- − Remove — removes the selected custom track. Default tracks (shipped with a sprite) can't be removed from the playlist — they're part of the asset.
- Default audio — switches back to the sprite's default tracks if you've been listening to your custom additions.
A small icon next to the playlist toggles the repeat mode: all (loop the whole list), single (loop the current track), or off (stop after the last track). The current mode appears in the tooltip.
Custom tracks you add are saved between sessions. If a file you added later moves or is deleted, the player silently skips it and moves on to the next valid track — no error popup.
Magnetic mode
By default, the music bar floats freely — you drag it like a window, and it stays where you put it.
Click 🧲 to switch it to magnetic mode. The bar then:
- Finds the nearest sprite on screen.
- Snaps to the bottom edge of that sprite.
- Follows the sprite as you drag the sprite around.
- Hides automatically when the attached sprite is hidden, and reappears when the sprite reappears.
If multiple sprites are on screen, magnetic mode tracks whichever is currently closest — drag the bar near a different sprite and it re-attaches. To pin the bar to a specific sprite, position it right under that sprite and turn magnetic on.
Click 🧲 again to detach. The bar returns to free-floating.
Owner sprites and lifecycle
The music player has two concepts of ownership:
- Standalone — opened from the tray. No owner sprite. The player exists independently of any sprite; it stays open until you close it explicitly.
- Sprite-owned — opened by activating an audio-bearing sprite. Closing the owning sprite closes the music player too. The default tracks come from that sprite's package.
In either case, custom tracks you've added are remembered. Your playlist persists even when the owner sprite changes.
When the app quits, the music player saves its current volume, magnetic state, repeat mode, and the list of custom track paths. On the next launch, an audio-bearing sprite restores all of these — so reopening a sprite is exactly where you left it.
Opacity
The music bar has its own opacity setting independent of any sprite. Adjust it from Settings → Opacity → Music mini bar. The default is fully opaque.
Settings
Settings hold every preference the app remembers between launches — theme, performance, autostart, opacity, default behaviors, and your display language. This chapter lists every setting and explains what it changes.
Opening Settings
Two entry points:
- Hub → ⚙ button in the top-right.
- Tray → Settings.
Both open the same Settings window. Closing the window saves immediately; there's no Apply button.
Theme
How the Hub and dialogs look.
- Mode — Dark or Light. Dark is the default. The change applies immediately to every open window.
- Accent color — Blue, Orange, Purple, Pink, Teal. Used for highlight elements (selected tabs, focus rings, primary buttons). Choose what matches your desktop.
The sprite windows themselves don't have a theme — they show your asset's pixels directly.
Startup
- Run on PC startup — when on, the app starts with Windows the next time you sign in. This launch goes straight to the tray without opening the Hub (so your sprites come back without a Hub window popping up). See the Getting Started chapter for the autostart launch path in detail.
Tutorial
- Replay tutorial — re-runs the five-step Hub tutorial overlay. Use this if you skipped it on first launch and want to revisit the basics. The editor's separate tutorial replays from the editor's own Help button.
Performance
- Battery saver mode (CPU/battery saving) — lowers the sprite polling rate from 60 Hz to 30 Hz. 60 fps videos drop to 30 fps (slightly jerky, but usable). In exchange, CPU usage roughly halves and battery life on laptops noticeably improves.
- Auto-pause when fullscreen game/presentation detected — when a fullscreen application (game, PowerPoint, video player) takes focus, the app auto-hides all sprites. They reappear when the fullscreen app closes or minimizes. Useful so sprites don't poke through over a fullscreen game.
- Video playback — picks how MP4 / WebM video sprites are decoded. Four choices:
- Auto (recommended) — the default. Picks per video based on codec and size. Large videos go to the OS native decoder (stable and efficient); WebM (VP9) stays on software decode. Leave it here unless you have a reason not to.
- SW (software decode) — always decodes on the CPU. The most compatible option; use it if a video misbehaves on the other backends.
- OS (native) — forces the built-in Windows video decoder. Stable and efficient, and what Auto picks for large videos.
- HW (hardware decode) — a separate-process GPU decode path, kept as a special-case compatibility fallback. Try it only if both Auto and SW have trouble with a particular video.
The first two toggles default to off. Turn them on if your sprites feel sluggish during gaming or if battery is draining faster than expected.
Interaction
- Click-through for all sprites (mouse pass-through) — when on, every active sprite (and every new sprite from now on) lets mouse input pass through to whatever is behind it. Drag and right-click on sprites stop working until you turn click-through off again. Per-sprite overrides via the Hub right panel still apply on top of this default.
See the Sprites chapter for the per-sprite click-through behavior.
Workshop
- Receive workshop updates manually — off by default. When off, subscribed Workshop assets update automatically in the background while no sprite from that asset is currently running. When on, the app shows a ⬆ UPD badge on the library card and waits for you to click Update now in the right panel.
See the Workshop chapter's Update detection section for the full automatic vs. manual flow, including how active sprites are handled.
Opacity
Three independent opacity sliders. Each is 10–100 %.
- New sprite default — what opacity new sprites start at. Existing sprites keep whatever you previously set per-instance. Change individual sprites from the Hub right panel.
- Hub window — opacity of the Hub itself. Lower it if the Hub feels too prominent on your desktop.
- Music mini bar — opacity of the music player bar.
The default for all three is 100 %.
Display language
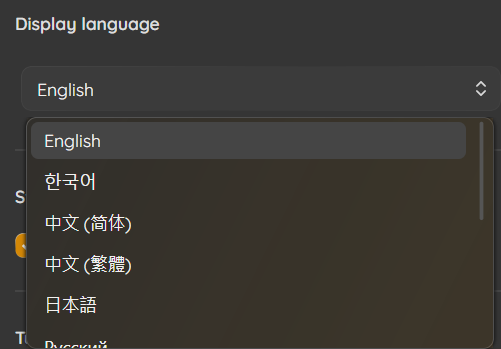
Pick the UI language. Twelve languages are supported:
English, Korean, Japanese, Simplified Chinese, Traditional Chinese, Russian, German, French, Spanish (Spain), Spanish (Latin America), Portuguese (Brazil), Portuguese (Portugal).
On the very first launch, the app picks the language automatically from your Windows UI culture. If your Windows is in German, you get German; if there's no match, English. The auto-detection runs only once — after you've explicitly chosen a language here, the app sticks with your choice.
Changing the language applies immediately to every open window.
Credits
Credits panel at the bottom of Settings:
- Development · UI Design · Planning — the developer.
- Mascot & Character Design — the designer credited for the mascot and brand artwork.
Hovering or clicking the credits area is informational only — no hidden behavior.
Danger zone
A single recovery action at the bottom of Settings:
- Reset runtime state + restart — clears the list of currently spawned sprites, the Hub position, the music mini bar position, and other runtime state, then restarts the app. Your asset files and settings are not touched — only the "what's currently on screen and where" state is reset. The previous state is kept as a backup file just in case.
A confirmation dialog appears first: "This closes the app, clears all spawned sprites, and starts it again. Asset files and settings will NOT be deleted. Proceed?"
Use this if the desktop layout gets into a weird state — a sprite you can't find, positions that won't restore correctly — and you want a clean slate without losing your library or preferences.
Where settings live on disk
%LocalAppData%/MinispriteEngine/state.jsonUser folders also sync to Steam Cloud (covered in the Workshop chapter). Other settings are local-only — each PC has its own preferences. Resetting to defaults is as simple as deleting state.json (with the app closed) and relaunching.
Achievements
Minisprite Engine ships with two Steam achievements in the current release. Both unlock silently in the background — Steam's standard unlock popup is what tells you it happened.
This chapter lists each achievement, how to earn it, and what to do if it doesn't unlock when you expected.
Tutorial Master
Complete both the Hub and Editor tutorials.
Unlocks when you've finished both the Hub tutorial (five steps, shown on first launch) and the Asset Editor tutorial (five steps, shown the first time you open the editor).
What counts as "finished" is pressing Done on the final step. If you skipped one of the tutorials on first launch, replay it later — Hub tutorial from Settings → Replay tutorial or from the Help (❓) button, Editor tutorial from the editor's own Help button — and click through to Done. The achievement triggers as soon as both flags are set.
The check is idempotent: if you've already unlocked it, replaying the tutorials again is a no-op.
First Workshop Publish
Publish your first sprite to the Steam Workshop.
Unlocks the moment your first Workshop publish succeeds — right after the "Workshop publish succeeded (id N)" toast in the editor.
The asset can be anything: a sprite, a mod, a tiny test draft. Publishing more than once doesn't unlock anything extra; only the first successful publish counts.
If a publish fails (Steam not running, terms not accepted, network issue), nothing unlocks. Resolve the error, retry, and the achievement fires on the next successful publish.
When an achievement doesn't unlock
Common causes:
- Steam isn't running. Achievements are part of Steamworks; they can't unlock without Steam. The app warns you on launch if Steam isn't running, so this is usually obvious.
- You're playing offline. Steam in offline mode can still track achievements locally, but they sync to the server when you come back online. Check your profile next time you're online.
- You signed in to a different Steam account. Achievements belong to a specific account. Switching accounts means starting from zero.
- The condition isn't actually met yet. For Tutorial Master, double-check that you pressed Done on both tutorials — not just Skip. Pressing Skip on either tutorial means it doesn't count until you replay it and click through to the end.
If you're confident the condition is met and Steam is online but nothing unlocked, check %LocalAppData%\MinispriteEngine\debug.log for an entry from the achievement system. The line will say whether the SetAchievement call succeeded or what Steam returned.
Viewing achievements
In the Steam client:
- Game library → Minisprite Engine → Achievements in the right-hand column. Shows your unlocked count and progress bar.
- Your profile → Achievements lists everything you've earned across all your games, including these two.
Both achievements have unlocked and locked icons. The locked icon shows by default so you can see what's available; the unlocked icon appears once you've earned it.
For Modders
This chapter is for users who want to write their own mods — small .dll packages that ship with a sprite asset and add custom behavior.
The full modding documentation is in the repository's docs/Modding.md. This chapter summarizes what's possible, how the runtime works at a high level, and where to start.
Modding link placeholder. The full modding doc will be linked here once the Steam guide is published. Until then, see docs/Modding.md in the install folder.
What you can build
A mod is a regular .NET 9 class library. As long as it can be expressed in managed code with Avalonia for UI, it can be a mod. Practical examples — including the six built-in mods you can study directly — cover:
- Productivity widgets (calculator, pomodoro timer, sticky note, calendar).
- Mini-games (tic-tac-toe with a minimax AI).
- Sprites that react to input (Lippy reacts to your microphone).
- Anything else that fits in a small floating window.
Mods can ship with or without sprite media. Mod-only assets (no animation) have a streamlined path in the Asset Editor — check Mod-only asset (no animation) and the editor disables every media-related section.
How mods load
The runtime is straightforward:
- The user clicks a card whose manifest declares a
modfield. - After the trust confirmation (if needed), the engine loads the bundled
.dllinto a collectibleAssemblyLoadContext. - It finds the one public class implementing
IMinispriteModand callsOnLoad(host). - Your mod creates whatever Avalonia window or UI it wants. The engine pre-applies the standard sprite-window behavior (transparent, topmost, hidden from taskbar, draggable).
- When the user toggles the sprite off, the engine calls
OnUnload()and unloads the assembly.
Because the load context is collectible, hot reload works — toggle the sprite off, rebuild your .dll, toggle it back on. No engine restart.
What the engine provides
IMinispriteHost gives you the things every mod needs:
- The asset id and folders — a read-only asset folder for the files you shipped, and a per-mod data folder for persistence.
- A factory for the pre-configured window (widget mode) and, if you want it, a matching overlay for wallpaper mode.
- A logger that writes to the engine's debug log.
- A way to ask the engine to deactivate your sprite.
- The current UI language (and a change notification), so your mod can localize itself without depending on the engine's own translations.
- Toast notifications, and a helper to decode any image/animation/video file into frames you can display.
For assets that bundle sprite media and a mod, host.Sprite gives you an ISpriteController to swap the displayed frame, resize the sprite, add your own right-click menu items, and set a hover tooltip — while the engine keeps handling the standard chrome (size, speed, opacity, click-through, close).
The full API is in docs/Modding.md. The interfaces live in MinispriteEngine.Core.Modding (IMinispriteMod, IMinispriteHost, ISpriteController). Members added after the first release have safe defaults, so a mod built against an older engine still loads.
Read the built-in mods
The most useful starting point is the source of the six built-in mods. Every built-in ships its source code in a source/ folder inside the asset:
%ProgramFiles%/Steam/steamapps/common/MinispriteEngine/
  BuiltinAssets/
    calculator/
      MinispriteCalculator.dll
      source/                 ← read these files
        Calculator.cs
        Calculator.csproj
        ...
    calendar/
      ...
    lippy/
      ...
    pomodoro/
      ...
    sticky-note/
      ...
    tictactoe/
      ...
Each one is a small, complete reference project. The calculator shows the simplest possible mod-only asset. Lippy shows a sprite-plus-mod combination with microphone capture. The calendar shows two-pane navigation and JSON persistence. Sticky-note shows a toolbar/content split with debounced auto-save. Tic-tac-toe shows a complete mini-game with minimax AI. Pomodoro shows a ticking timer with per-day stat buckets.
Pick the one closest to what you want to build and copy its project as a starting point.
Project setup quick view
Your mod is a regular .csproj targeting net9.0:
<Project Sdk="Microsoft.NET.Sdk">
  <PropertyGroup>
    <TargetFramework>net9.0</TargetFramework>
    <ImplicitUsings>enable</ImplicitUsings>
    <Nullable>enable</Nullable>
  </PropertyGroup>
  <ItemGroup>
    <PackageReference Include="Avalonia" Version="11.3.14" />
    <ProjectReference Include="path/to/MinispriteEngine.Core.csproj">
      <Private>false</Private>
      <ExcludeAssets>runtime</ExcludeAssets>
    </ProjectReference>
  </ItemGroup>
</Project>
Setting Private=false and ExcludeAssets=runtime on the Core reference is important — it prevents the engine's own DLLs from being bundled inside your mod (which would cause type-identity conflicts at load time).
Full implementation example, packaging instructions, and the PackageBuilder reference for building the data.minisprite container are all in docs/Modding.md.
Publishing your mod to the Workshop
You publish a mod exactly the same way you publish a regular asset (covered in the Asset Editor chapter). The only difference is that users see the ⚠ MOD badge on your card until they trust it.
Things you can do to help users feel comfortable trusting your mod:
- Ship the source. Drop a
source/folder alongside the.dll, the same way the built-ins do. Users (and other modders) can read it. ILSpy / dnSpy can decompile your.dllanyway — releasing source as a courtesy is the established norm. - Write a clear description. The Workshop page description is what users see before they trust. Say what the mod does, what permissions it needs (microphone, file system, network), and why.
- Use a recognizable author name. Steam display name + consistent branding across your mods.
- Respond to comments. A maintained mod is a trustworthy mod.
What the engine won't do
- Sandbox your mod. Mods run with the full privileges of the process. The engine cannot stop a malicious mod from doing anything a .NET program can do.
- Resolve transitive dependencies you didn't ship. If you reference a NuGet package other than Avalonia or
MinispriteEngine.Core, bundle its.dllinside your asset. - Support your mod for you. The engine maintains its API; mod issues belong to the mod's author.
Where to ask questions
For engine API questions or bug reports, use the game's Steam community hub or the GitHub issues (if a public repository is available). For questions about the modding API surface specifically, docs/Modding.md is the source of truth.
Troubleshooting
This chapter covers common issues, what causes them, and how to fix them. When in doubt, check the debug log first — most failures write a line there.
The debug log
The app writes diagnostic messages to:
%LocalAppData%\MinispriteEngine\debug.log(Paste that path into the Windows Run dialog or Explorer's address bar.) The log is a plain text file that survives between launches. When something goes wrong — a mod fails to load, a publish fails, auto-save can't write — the user-facing toast tells you the debug.log has the details, and that's where to look first.
If you're reporting a bug or asking for help, attach the recent portion of debug.log to your message.
The debug overlay and log window
For live diagnosis, the app has a built-in debug view you can toggle with a keyboard shortcut (it starts off every session and isn't saved):
- Ctrl + D — toggles a lightweight overlay label in the top-left corner of each sprite. No log window, no measurement — just a small identifier so you can tell which sprite is which.
- Ctrl + Shift + D — the full debug mode: the sprite overlay labels plus a debug log window that shows the live log, with a side panel of resource usage (whole-app and per-asset CPU / memory / GPU). Useful for spotting which sprite is heavy when performance drops.
Press the same shortcut again to turn it off. This is the fastest way to see what a sprite is doing without digging through debug.log, and the numbers in the resource panel are handy to include when you report a performance problem.
The app won't start
"Steam is required" dialog
Minisprite Engine runs through the Steam client.
Please start Steam and try again.
— Steam is not installed or not running.
— Workshop asset sync and Cloud sync features depend on Steam.
The app needs Steam running because Workshop and Cloud features depend on it. Start Steam first, then launch the app again from Steam or the desktop shortcut.
If Steam is running and you still see this dialog, fully quit Steam (right-click the tray icon → Exit, wait a few seconds for the process to actually close) and start it again.
Launches but immediately crashes / shows a system error
Two common causes on older Windows installs:
- Windows 10 build is too old. The minimum supported build is Windows 10 1809 (17763). Check your build in Settings → System → About. Windows Update will pull you forward to 22H2.
- A specific Windows servicing patch is missing. Even on a supported build, some installs need recent cumulative updates to run modern .NET runtimes. Run Settings → Windows Update and install everything pending, then reboot.
Self-contained .NET 9 is bundled with the app, so you don't need to install .NET separately. If the bundled runtime won't initialize because of an OS patch level, Windows Update is the fix.
A sprite or animation looks wrong
Sprite freezes the app when activated
Very large GIFs (1024 px and up with 60+ frames) can use hundreds of megabytes of memory once decoded. The Hub flags these:
- A ⚡ caution badge on the card means the asset is heavy: "Heavy asset (~N MB) — may stutter on low-spec PCs".
- A ⚡ high badge means it might freeze: "Very heavy asset (~N MB) — risk of freeze or out-of-memory".
If the app freezes for several seconds the first time you activate one of these cards, that's the decoder loading frames. Wait it out — once decoded, playback is normal. If your PC runs out of memory, deactivate the asset and try a smaller version.
Large videos avoid this because they stream from disk frame-by-frame instead of loading everything into memory at once. Image-based assets (PNG sequence, GIF, Aseprite) are held in RAM, so the practical fix is to keep the source dimensions and frame count reasonable — or convert a very large animation to an MP4 / WebM video, which the Hub streams rather than holding resident.
If a Workshop asset shows the ⚡ badge, it was published with a heavy image-based payload. Either accept the freeze risk on your hardware, or ask the author for a lighter (or video-based) version.
A video sprite won't play, stutters, or shows a black box
Video decoding has several backends, and a specific file occasionally does better on one than another. In Settings → Performance → Video playback, the default is Auto. If a video sprite misbehaves:
- Switch to SW (software decode) — the most compatible option.
- Re-spawn the sprite (backend changes apply on the next spawn, so close and reopen the sprite).
- If SW works but you want it smoother, try OS (native); HW (hardware decode) is a last-resort fallback for stubborn files.
If nothing plays the file, it may use a codec the system can't decode — re-export it as H.264 MP4 (or VP9 WebM for transparency) and try again. The debug log records which backend was used and any decoder error.
Video has a colored fringe / haloing
This is usually the alpha key threshold. Open the asset in the editor (or unpack the source if it's from the Workshop), increase the Tolerance under the alpha key section, and enable Anti-aliasing (soft edges). Suggested ranges:
- 0–4 for lossless formats (PNG / GIF / Aseprite).
- 8–32 for compressed video (MP4 / WebM).
Aseprite layers / loops aren't honored
The engine supports layer blending, linked cels, and tag loops through AsepriteDotNet. If something doesn't match what you see in Aseprite itself, check:
- Hidden layers in Aseprite are also hidden in the export.
- Only the layers visible at export time are included.
- The active tag determines playback range. With no tag, the whole timeline plays.
Workshop and Cloud sync
Subscribed asset isn't appearing in the Library
- Wait a few seconds. Steam downloads on its own schedule; the asset usually shows up within ~10 seconds of subscribing.
- Make sure Steam is running. A subscribed asset that wasn't downloaded while Steam was offline will arrive when Steam comes back online.
- Force a refresh. Press F5 while focused on the Library tab. The Hub re-reads asset manifests from disk and re-syncs against Steam's subscribed list.
- Restart Steam. Steam occasionally caches stale subscription state. A full exit (tray icon → Exit) and restart resolves it.
"☁ Sync failed" appears in the sidebar
Cloud sync writes user folders to Steam Cloud. Failure usually means:
- Cloud is disabled for the app. Check Steam Settings → Cloud and make sure cloud sync is enabled globally. Then check the per-game setting in the game's properties.
- Quota is full. Folder data is tiny, but if another app shares the quota and it's full, writes fail.
- Transient Steam error. Restart Steam.
Local folder edits are preserved regardless — Cloud sync failure never causes data loss on the current PC. The label will switch back to ☁ Synced once a write succeeds.
Update toast shows but the asset doesn't update
If the toast says "Update failed: {title}" or "Steam unavailable":
- Make sure Steam is running.
- Click the ⬆ UPD badge again to retry.
- If the failure persists, check
debug.log— the line includes Steam's specific error code, which tells you whether the issue is network, permission, or asset-side.
Auto-update badge keeps reappearing after updating
The badge clears once the new version is downloaded and the manifest reloaded. If it reappears, the modder published yet another update — Workshop is publishing-side; multiple updates in a short window are common right after release.
Mods
"Mod 'X' failed to load" toast
The .dll couldn't be loaded into the process. The sprite still appears (if the asset has media), it just runs without the mod logic. Check debug.log for the .NET exception. Common causes listed in the Mods chapter:
- Built against a newer engine API than this version.
- Built against a much older engine API where the surface has since changed. The ⚠ VER badge on the card warns you about this risk before you click — see the Mods chapter for the badge and the engine compatibility model.
- Missing native dependency.
- Wrong CPU architecture.
If the mod is from the Workshop, post the relevant debug.log lines in the Workshop page comments — the mod author needs them to fix it.
Lippy never reacts to my voice
The mic capture needs Windows permission:
- Windows Settings → Privacy & security → Microphone → make sure Microphone access is on and Let desktop apps access your microphone is on.
- The first time Lippy runs, Windows may prompt for permission via a system dialog. If you dismissed it, re-enable in the settings above.
A built-in mod's UI is in the wrong language
Built-in mods (calculator, calendar, pomodoro, etc.) honor the app's language setting. If the language was changed while the mod was open, deactivate and reactivate the sprite to apply.
Asset Editor
Auto-save failed toast
Auto-save failed: {reason}
The editor couldn't write to the draft folder. Causes:
- Disk full.
- The draft folder was deleted or moved while the editor was open.
- File permissions changed (rare on a normal Windows install).
- An antivirus locked the file briefly. Save again — usually resolves on the second attempt.
"Manifest values don't match" bar
Your manifest.json width / height / fps / frames don't match what the decoder measured from the actual media. Click Auto-fix with actual values to overwrite the manifest with the decoder's numbers. Safe; the media on disk is the source of truth.
Publish failed — Workshop terms
You need to accept the Steam Community Workshop terms first.
Steam opens the terms in your default browser automatically. If the browser didn't appear, open the Workshop tab in Steam, click any "Submit your own" link, and accept the terms there. Then retry the publish.
Achievements
Covered in the Achievements chapter. Short version: make sure Steam is online, you've actually finished the condition (pressing Done on the tutorials, not Skip), and check debug.log for the SetAchievement line.
Where to ask for help
- Steam community hub — the game's discussion forum is the best place for general questions and bug reports. Attach the recent part of
debug.logfor anything that looks like a crash or unexpected behavior. - Workshop page comments — for issues specific to a community-made sprite or mod, comment on the Workshop page so the asset's author can respond.
- Steam reviews — only useful for the overall product, not for getting help with a specific issue. Reviews don't get a response from the developer the way discussion threads do.
Resetting to a clean state
If something is wrong and you can't figure out what:
- Quit the app (tray → Exit).
- Back up
%LocalAppData%\MinispriteEngine\if you have drafts you don't want to lose. - Delete the whole
MinispriteEnginefolder underLocalAppData. - Relaunch the app.
You'll be back to first-launch state. Subscribed Workshop assets return automatically because Steam restores subscriptions; your own drafts in the backup can be copied back into the new Drafts/ folder.
Display Modes & Wallpaper Mode
Every sprite has a Display setting that decides where it sits in the window stack — as a floating widget, always above everything, or down on the wallpaper layer behind your other windows. This chapter covers the three display modes, showing a sprite across all virtual desktops, the fill options for wallpaper mode, and what to do when a sprite gets stuck behind other windows.
The three display modes
Right-click any sprite → Display, or select the sprite's card in the Hub and use the right-side panel. Three choices:
- Default — a normal window. Other application windows can cover it, and it can cover them, just like any ordinary window. Best for most ambient sprites.
- Always On Top — the sprite stays above every other window, including full-screen-ish app windows. Best for something you always want visible: a pomodoro timer, a sticky note, a status mascot.
- On Wallpaper — the sprite drops down onto the wallpaper layer, between your wallpaper and your desktop icons. Application windows cover it. Use this to turn a sprite into an animated replacement for a static wallpaper.
The current mode has a ✓ next to it in the right-click menu. The setting is saved per sprite and restored on the next launch — including after a reboot when Run on PC startup is on.
Show on All Desktops
Below the three modes, the Display submenu has a Show on All Desktops toggle (✓ when on). Windows virtual desktops normally keep each window on the desktop where it was opened; turn this on and the sprite appears on every virtual desktop instead of just one.
Handy for a mascot or clock you want present no matter which desktop you switch to. It works in any of the three display modes.
Wallpaper mode in detail
On Wallpaper reparents the sprite into the desktop's wallpaper layer so it renders as if it were part of the background. Your normal windows sit above it; only the wallpaper (and the fill options below) sit behind it.
A few things behave differently in this mode:
- Dragging still works — left-click the sprite's visible pixels and drag as usual.
- Right-click still works — the same context menu is available.
- Click-through is disabled while a sprite is on the wallpaper. This is deliberate: a click-through sprite behind every window with no way to grab it would be impossible to recover. Click-through is re-enabled automatically when you switch back to Default or Always On Top.
The first-time notice
The first time you put any sprite on the wallpaper, a short dialog appears:
About Wallpaper Mode
Sprites will display over your current wallpaper. Some external wallpaper apps may not be compatible — if the sprite is hidden, switch back to Widget mode.
Check Don't show again to suppress it. This is just a heads-up about the compatibility caveat below; wallpaper mode itself is a stable feature.
Fill options (wallpaper mode only)
When a sprite is on the wallpaper, the Display submenu gains a Fill mode group. It scales the sprite to your screen instead of leaving it at its widget size — useful when you actually want the sprite to be the wallpaper rather than a small element on it.
- Off — the sprite keeps its normal size (the default).
- Cover — scales the sprite to fill the whole screen, keeping its aspect ratio. Parts that overflow the edges are cropped. No empty bars, but you may lose some of the image at the edges.
- Fit — scales the sprite so the entire image is visible, keeping its aspect ratio. Nothing is cropped, but there may be empty space around it if the sprite's shape doesn't match your screen's.
Fill mode is only available while the sprite is on the wallpaper. Switch back to Default or Always On Top and the sprite returns to its regular size.
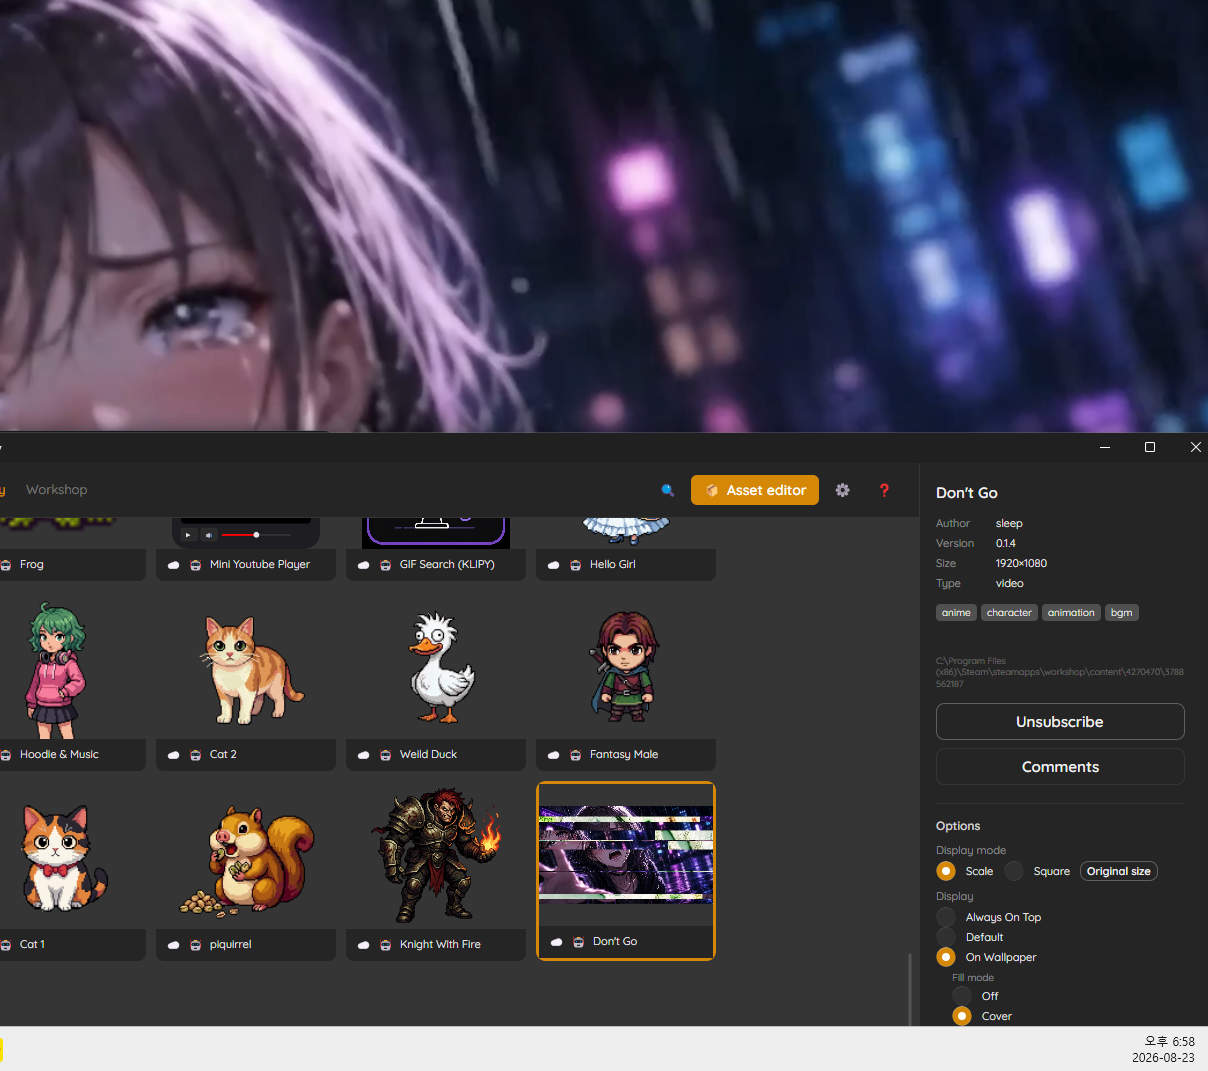
Recovering a stuck sprite
Because a wallpaper-mode sprite sits behind every window, it's possible to lose track of it — covered by app windows, or hidden entirely if another wallpaper app takes over the layer. You can always recover it from the Hub:
- Open the Hub (left-click the tray icon).
- Select the sprite's card.
- In the right-side panel, use the Recover controls:
- Switch back to Widget mode — moves the sprite back to Default display, floating above the wallpaper again.
- Re-enable click events — restores interaction if the sprite was left click-through.
You can also just re-pick Default or Always On Top from the Display menu — the sprite reappears as a normal floating widget on top of the wallpaper, regardless of what any other app is rendering.
Mods on the wallpaper
Mod sprites (calculator, pomodoro, sticky note, calendar, tic-tac-toe) support wallpaper mode too. The mode and click-through state are remembered per asset across sessions.
One trade-off for interactive mods: wallpaper-layer windows sit below your desktop icons. If a mod window overlaps a desktop icon, clicks on the overlapping area go to the desktop, not to the mod. Move the mod window to an icon-free part of the screen for full interactivity. This rarely matters for a mascot you don't click, but it matters for mods with buttons — place those in an empty area.
Compatibility with other wallpaper apps
Wallpaper mode uses standard Windows desktop-shell behavior, and it coexists with most other wallpaper apps: the sprite composites above image, video, web, and scripted wallpapers.
The exception is a wallpaper that runs its own separate program (an application-type wallpaper). Those render through their own path, and the sprite's layer order can't be guaranteed against them — the sprite may end up hidden underneath.
If a sprite disappears under another app's wallpaper, switch it back to Default or Always On Top. In those modes the sprite is an ordinary floating window and shows on top of whatever is rendering the background.
Persistence and reboot
Each sprite's display mode is saved and restored on the next launch, including after a reboot when Run on PC startup is enabled.
If the wallpaper layer isn't ready yet right after boot (the app can launch before Windows finishes setting up the desktop), the app retries attaching for a few seconds. In the rare case it can't attach, the sprite falls back to Default mode and you can switch it back manually. The app also re-attaches automatically when you change your wallpaper or plug/unplug a monitor, so sprites don't get lost when the desktop reconfigures.